Epson XP-446 Users Guide - Page 114
Additional Scanning Settings - Main Settings Tab, File Name, Settings, Folder, Select, Parent topic
 |
View all Epson XP-446 manuals
Add to My Manuals
Save this manual to your list of manuals |
Page 114 highlights
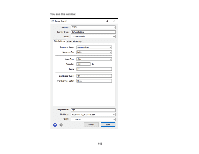
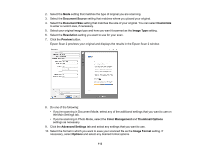
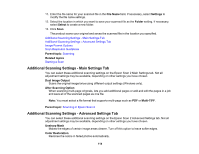
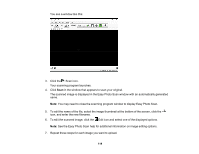
11. Enter the file name for your scanned file in the File Name field. If necessary, select Settings to modify the file name settings. 12. Select the location in which you want to save your scanned file as the Folder setting. If necessary, select Select to create a new folder. 13. Click Scan. The product scans your original and saves the scanned file in the location you specified. Additional Scanning Settings - Main Settings Tab Additional Scanning Settings - Advanced Settings Tab Image Format Options Scan Resolution Guidelines Parent topic: Scanning Related topics Starting a Scan Additional Scanning Settings - Main Settings Tab You can select these additional scanning settings on the Epson Scan 2 Main Settings tab. Not all adjustment settings may be available, depending on other settings you have chosen. Dual Image Output Scans the original image twice using different output settings (Windows only). After Scanning Option When scanning multi-page originals, lets you add additional pages or add and edit the pages in a job and save all of the scanned pages as one file. Note: You must select a file format that supports multi-page such as PDF or Multi-TIFF. Parent topic: Scanning in Epson Scan 2 Additional Scanning Settings - Advanced Settings Tab You can select these additional scanning settings on the Epson Scan 2 Advanced Settings tab. Not all adjustment settings may be available, depending on other settings you have chosen. Unsharp Mask Makes the edges of certain image areas clearer. Turn off this option to leave softer edges. Color Restoration Restores the colors in faded photos automatically. 114
-
 1
1 -
2
-
3
-
4
-
5
-
6
-
7
-
8
-
9
-
10
-
11
-
12
-
13
-
14
-
15
-
16
-
17
-
18
-
19
-
20
-
21
-
22
-
23
-
24
-
25
-
26
-
27
-
28
-
29
-
30
-
31
-
32
-
33
-
34
-
35
-
36
-
37
-
38
-
39
-
40
-
41
-
42
-
43
-
44
-
45
-
46
-
47
-
48
-
49
-
50
-
51
-
52
-
53
-
54
-
55
-
56
-
57
-
58
-
59
-
60
-
61
-
62
-
63
-
64
-
65
-
66
-
67
-
68
-
69
-
70
-
71
-
72
-
73
-
74
-
75
-
76
-
77
-
78
-
79
-
80
-
81
-
82
-
83
-
84
-
85
-
86
-
87
-
88
-
89
-
90
-
91
-
92
-
93
-
94
-
95
-
96
-
97
-
98
-
99
-
100
-
101
-
102
-
103
-
104
-
105
-
106
-
107
-
108
-
 109
109 -
 110
110 -
 111
111 -
 112
112 -
 113
113 -
 114
114 -
 115
115 -
 116
116 -
 117
117 -
 118
118 -
 119
119 -
120
-
121
-
122
-
123
-
124
-
125
-
126
-
127
-
128
-
129
-
130
-
131
-
132
-
133
-
134
-
135
-
136
-
137
-
138
-
139
-
140
-
141
-
142
-
143
-
144
-
145
-
146
-
147
-
148
-
149
-
150
-
151
-
152
-
153
-
154
-
155
-
156
-
157
-
158
-
159
-
160
-
161
-
162
-
163
-
164
-
165
-
166
-
167
-
168
-
169
-
170
-
171
-
172
-
173
-
174
-
175
-
176
-
177
-
178
-
179
-
180
-
181
-
182
-
183
-
184
-
185
-
186
-
187
-
188
-
189
-
190
-
191
-
192
-
193
-
194
-
195
-
196
-
197
-
198
-
199
-
200
-
201
-
202
-
203
-
204
-
205
-
206
-
207
-
208
-
209
-
210
-
211
-
212
-
213
-
214
-
215
-
216
-
217
-
218
-
219
-
220
-
221
-
222
-
223
-
224
-
225
-
226
-
227
-
228
-
229
-
230
-
231
-
232
-
233
-
234
-
235
-
236
-
237
-
238
-
239
-
240
-
241
-
242
-
243
-
244
-
245
-
246
-
247
-
248
-
249
-
250
-
251
 |
 |
