Epson XP-446 Users Guide - Page 147
Photo Layout Options, Automatic layout, Place photos manually, Finished, Parent topic
 |
View all Epson XP-446 manuals
Add to My Manuals
Save this manual to your list of manuals |
Page 147 highlights
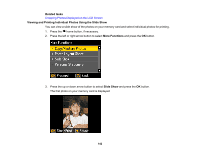
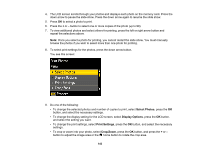
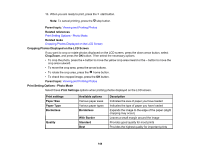
8. If you see the screen above, do one of the following: • To allow your product to place photos in the layout automatically, select Automatic layout and press the OK button. Press the + button to select a photo to print. If you need to deselect a photo, press the - button. Press the OK button when you are finished. • To place photos in the layout manually, select Place photos manually and press the OK button. Press the arrow buttons displayed to change layout options, pressing the OK button to confirm each photo placement. Note: If the printer does not automatically advance to the next screen when you have finished placing your photos, press the arrow buttons displayed to select Finished, and press the OK button. 9. If you want to change the print settings for the photo layout sheet, press the up or down arrow button to select Menu, and press the OK button. 10. Press the + or - button to select one or more copies of each photo layout sheet (up to 99). 11. Press the OK button. 12. To print more than one copy of the photo layout sheet, press the + or - button to select the number (up to 99). 13. When you are ready to print, press the start button. Note: To cancel printing, press the stop button. Photo Layout Options Parent topic: Printing from a Memory Card Related references Print Setting Options - Photo Mode Related topics Loading Paper Photo Layout Options Select the layout you want to use when printing your photos in a layout. 2-up, 4-up, 8-up, or 20-up Print 2, 4, 8, or 20 photos on one sheet. Upper ½ or Lower ½ Print one photo in the upper or lower half of the sheet. 147
-
 1
1 -
2
-
3
-
4
-
5
-
6
-
7
-
8
-
9
-
10
-
11
-
12
-
13
-
14
-
15
-
16
-
17
-
18
-
19
-
20
-
21
-
22
-
23
-
24
-
25
-
26
-
27
-
28
-
29
-
30
-
31
-
32
-
33
-
34
-
35
-
36
-
37
-
38
-
39
-
40
-
41
-
42
-
43
-
44
-
45
-
46
-
47
-
48
-
49
-
50
-
51
-
52
-
53
-
54
-
55
-
56
-
57
-
58
-
59
-
60
-
61
-
62
-
63
-
64
-
65
-
66
-
67
-
68
-
69
-
70
-
71
-
72
-
73
-
74
-
75
-
76
-
77
-
78
-
79
-
80
-
81
-
82
-
83
-
84
-
85
-
86
-
87
-
88
-
89
-
90
-
91
-
92
-
93
-
94
-
95
-
96
-
97
-
98
-
99
-
100
-
101
-
102
-
103
-
104
-
105
-
106
-
107
-
108
-
109
-
110
-
111
-
112
-
113
-
114
-
115
-
116
-
117
-
118
-
119
-
120
-
121
-
122
-
123
-
124
-
125
-
126
-
127
-
128
-
129
-
130
-
131
-
132
-
133
-
134
-
135
-
136
-
137
-
138
-
139
-
140
-
141
-
 142
142 -
 143
143 -
 144
144 -
 145
145 -
 146
146 -
 147
147 -
 148
148 -
 149
149 -
 150
150 -
 151
151 -
 152
152 -
153
-
154
-
155
-
156
-
157
-
158
-
159
-
160
-
161
-
162
-
163
-
164
-
165
-
166
-
167
-
168
-
169
-
170
-
171
-
172
-
173
-
174
-
175
-
176
-
177
-
178
-
179
-
180
-
181
-
182
-
183
-
184
-
185
-
186
-
187
-
188
-
189
-
190
-
191
-
192
-
193
-
194
-
195
-
196
-
197
-
198
-
199
-
200
-
201
-
202
-
203
-
204
-
205
-
206
-
207
-
208
-
209
-
210
-
211
-
212
-
213
-
214
-
215
-
216
-
217
-
218
-
219
-
220
-
221
-
222
-
223
-
224
-
225
-
226
-
227
-
228
-
229
-
230
-
231
-
232
-
233
-
234
-
235
-
236
-
237
-
238
-
239
-
240
-
241
-
242
-
243
-
244
-
245
-
246
-
247
-
248
-
249
-
250
-
251
 |
 |