Fujitsu FPCM21622 U820 User's Guide - Page 78
Headphone Jack, Microphone Jack, External Video Port
 |
View all Fujitsu FPCM21622 manuals
Add to My Manuals
Save this manual to your list of manuals |
Page 78 highlights
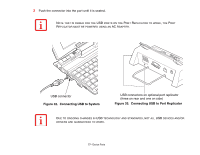
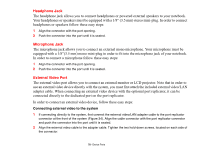
Headphone Jack The headphone jack allows you to connect headphones or powered external speakers to your notebook. Your headphones or speakers must be equipped with a 1/8" (3.5 mm) stereo mini-plug. In order to connect headphones or speakers follow these easy steps: 1 Align the connector with the port opening. 2 Push the connector into the port until it is seated. Microphone Jack The microphone jack allows you to connect an external mono microphone. Your microphone must be equipped with a 1/8"(3.5 mm) mono mini-plug in order to fit into the microphone jack of your notebook. In order to connect a microphone follow these easy steps: 1 Align the connector with the port opening. 2 Push the connector into the port until it is seated. External Video Port The external video port allows you to connect an external monitor or LCD projector. Note that in order to use an external video device directly with the system, you must first attach the included external video/LAN adapter cable. When connecting an external video device with the optional port replicator, it can be connected directly to the dedicated port on the port replicator. In order to connect an external video device, follow these easy steps: Connecting external video to the system 1 If connecting directly to the system, first connect the external video/LAN adapter cable to the port replicator connector at the front of the system (Figure 34). Align the cable connector with the port replicator connector and push the connector into the port until it is seated. 2 Align the external video cable to the adapter cable. Tighten the two hold-down screws, located on each side of the connector. 78 - Device Ports
-
 1
1 -
2
-
3
-
4
-
5
-
6
-
7
-
8
-
9
-
10
-
11
-
12
-
13
-
14
-
15
-
16
-
17
-
18
-
19
-
20
-
21
-
22
-
23
-
24
-
25
-
26
-
27
-
28
-
29
-
30
-
31
-
32
-
33
-
34
-
35
-
36
-
37
-
38
-
39
-
40
-
41
-
42
-
43
-
44
-
45
-
46
-
47
-
48
-
49
-
50
-
51
-
52
-
53
-
54
-
55
-
56
-
57
-
58
-
59
-
60
-
61
-
62
-
63
-
64
-
65
-
66
-
67
-
68
-
69
-
70
-
71
-
72
-
 73
73 -
 74
74 -
 75
75 -
 76
76 -
 77
77 -
 78
78 -
 79
79 -
 80
80 -
 81
81 -
 82
82 -
 83
83 -
84
-
85
-
86
-
87
-
88
-
89
-
90
-
91
-
92
-
93
-
94
-
95
-
96
-
97
-
98
-
99
-
100
-
101
-
102
-
103
-
104
-
105
-
106
-
107
-
108
-
109
-
110
-
111
-
112
-
113
-
114
-
115
-
116
-
117
-
118
-
119
-
120
-
121
-
122
-
123
-
124
-
125
-
126
-
127
-
128
-
129
-
130
-
131
-
132
-
133
-
134
-
135
-
136
-
137
-
138
-
139
-
140
-
141
-
142
-
143
-
144
-
145
-
146
-
147
-
148
-
149
-
150
-
151
-
152
-
153
-
154
-
155
-
156
-
157
-
158
-
159
-
160
-
161
-
162
-
163
-
164
-
165
-
166
-
167
-
168
-
169
-
170
-
171
-
172
-
173
-
174
 |
 |
