HP 17-p000 17-p199 - Maintenance and Service Guide - Page 59
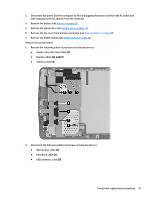
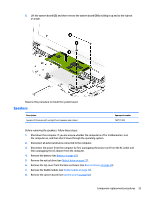
Disconnect the following cables if you have not already done so, Display cables
 |
View all HP 17-p000 manuals
Add to My Manuals
Save this manual to your list of manuals |
Page 59 highlights
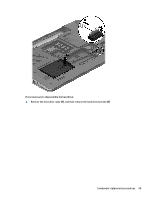
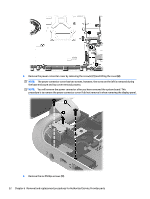
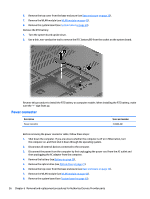
3. Disconnect the power from the computer by first unplugging the power cord from the AC outlet and then unplugging the AC adapter from the computer. 4. Remove the battery (see Battery on page 26), 5. Remove the optical drive (see Optical drive on page 27). 6. Remove the top cover from the base enclosure (see Base enclosure on page 30). 7. Remove the WLAN module (see WLAN module on page 42). Remove the system board: 1. Remove the following cables if you have not already done so: ● Power connector board cable (1) ● Display cables (2), and (3) ● Speaker cable (4) 2. Disconnect the following cables if you have not already done so: ● Optical drive cable (1) ● Hard drive cable (2) ● USB connector cable (3) Component replacement procedures 51
-
 1
1 -
2
-
3
-
4
-
5
-
6
-
7
-
8
-
9
-
10
-
11
-
12
-
13
-
14
-
15
-
16
-
17
-
18
-
19
-
20
-
21
-
22
-
23
-
24
-
25
-
26
-
27
-
28
-
29
-
30
-
31
-
32
-
33
-
34
-
35
-
36
-
37
-
38
-
39
-
40
-
41
-
42
-
43
-
44
-
45
-
46
-
47
-
48
-
49
-
50
-
51
-
52
-
53
-
 54
54 -
 55
55 -
 56
56 -
 57
57 -
 58
58 -
 59
59 -
 60
60 -
 61
61 -
 62
62 -
 63
63 -
 64
64 -
65
-
66
-
67
-
68
-
69
-
70
-
71
-
72
-
73
-
74
-
75
-
76
-
77
-
78
-
79
-
80
-
81
-
82
-
83
-
84
-
85
-
86
-
87
-
88
-
89
-
90
-
91
-
92
-
93
-
94
-
95
-
96
-
97
-
98
-
99
-
100
-
101
-
102
-
103
-
104
-
105
-
106
 |
 |

3.
Disconnect the power from the computer by first unplugging the power cord from the AC outlet and
then unplugging the AC adapter from the computer.
4.
Remove the battery (see
Battery
on page
26
),
5.
Remove the optical drive (see
Optical drive
on page
27
).
6.
Remove the top cover from the base enclosure (see
Base enclosure
on page
30
).
7.
Remove the WLAN module (see
WLAN module
on page
42
).
Remove the system board:
1.
Remove the following cables if you have not already done so:
●
Power connector board cable
(1)
●
Display cables
(2), and (3)
●
Speaker cable
(4)
2.
Disconnect the following cables if you have not already done so:
●
Optical drive cable
(1)
●
Hard drive cable
(2)
●
USB connector cable
(3)
Component replacement procedures
51