HP 2500c HP 2500C/C+/CM Professional Series Color Printer - (English) User's G - Page 25
Maintaining the Printer
 |
View all HP 2500c manuals
Add to My Manuals
Save this manual to your list of manuals |
Page 25 highlights
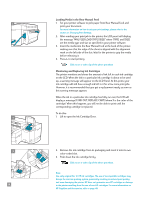
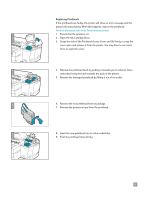
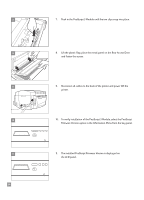
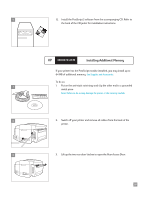
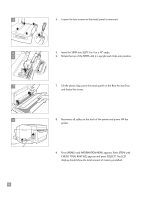
HP 2500C/C+/CM Maintaining the Printer This section contains information on utilities for maintaining the printer. They include: • Cleaning Printheads • Aligning Printheads • Calibrating Color Clean Printheads Whenever print quality noticeably decreases it is a good idea to perform the " Clean Printheads" utility either through the HP 2500C Toolbox on your computer or from the Control Panel on the printer. Please refer to the Maintenance Tab of the Toolbox if you wish to clean the printheads from the Toolbox. The "Clean Printheads" utility consists of 3 levels of cleaning. Each level of cleaning uses some ink to clear the printheads. It is recommended that you start with Level 1 before proceeding to subsequent levels. Note that Level 3 takes the longest and uses the most ink. To run the "Clean Printheads" utility through the Control Panel: 1. Press [Menu] until DIAGNOSTICS MENU appears. 2. Press [Item] to select either CLEAN PRNT-HDS LEVEL 1, 2 or 3. 3. Press [Select] to clean printheads. Align Printheads Although you may not notice misalignment in your printouts, it is recommended that you run the "Align Printheads" utility whenever the LCD displays the message "PRNT-HDS NOT ALIGNED". This ensures that you have the best possible print quality. You may align the printheads either through the Toolbox or from the Control Panel. Please refer to the Maintenance Tab of the Toolbox if you wish to align the printheads from the Toolbox. To run the "Align Printheads" utility through the Control Panel: 1. Press [Menu] until DIAGNOSTICS MENU appears. 2. Press [Item] until ALIGN PRNT-HDS appears. 3. Press [Select]. 4. The printer will print a page with 5 sets of alignment patterns. 5. In each set (A, B, C, D or E) select the most aligned (straightest) pair of lines (1, 2, 3, 4 or 5). 6. Enter the corresponding numbers in the Control Panel by pressing [Value]. 7. When you have entered a value for a set, press [Item] to move to the next. 21
-
 1
1 -
2
-
3
-
4
-
5
-
6
-
7
-
8
-
9
-
10
-
11
-
12
-
13
-
14
-
15
-
16
-
17
-
18
-
19
-
 20
20 -
 21
21 -
 22
22 -
 23
23 -
 24
24 -
 25
25 -
 26
26 -
 27
27 -
 28
28 -
 29
29 -
 30
30 -
31
-
32
-
33
-
34
-
35
-
36
-
37
-
38
-
39
-
40
-
41
-
42
-
43
-
44
-
45
-
46
-
47
-
48
-
49
-
50
-
51
-
52
-
53
-
54
-
55
-
56
-
57
-
58
-
59
-
60
-
61
-
62
-
63
-
64
-
65
-
66
 |
 |