HP 4215 HP Officejet 4200 series all-in-one - (English) User Guide - Page 93
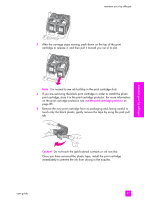
use the print cartridge protector, Caution, touch only the black plastic - officejet all in one ink cartridge
 |
UPC - 829160155845
View all HP 4215 manuals
Add to My Manuals
Save this manual to your list of manuals |
Page 93 highlights
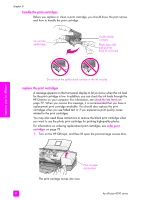
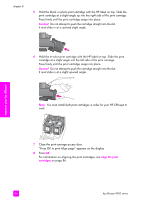
maintain your hp officejet 2 After the carriage stops moving, push down on the top of the print cartridge to release it, and then pull it toward you out of its slot. maintain your hp officejet Note: It is normal to see ink buildup in the print cartridge slots. 3 If you are removing the black print cartridge in order to install the photo print cartridge, store it in the print cartridge protector. For more information on the print cartridge protector, see use the print cartridge protector on page 85. 4 Remove the new print cartridge from its packaging and, being careful to touch only the black plastic, gently remove the tape by using the pink pull tab. Caution! Do not touch the gold-colored contacts or ink nozzles. Once you have removed the plastic tape, install the print cartridge immediately to prevent the ink from drying in the nozzles. user guide 83
-
 1
1 -
2
-
3
-
4
-
5
-
6
-
7
-
8
-
9
-
10
-
11
-
12
-
13
-
14
-
15
-
16
-
17
-
18
-
19
-
20
-
21
-
22
-
23
-
24
-
25
-
26
-
27
-
28
-
29
-
30
-
31
-
32
-
33
-
34
-
35
-
36
-
37
-
38
-
39
-
40
-
41
-
42
-
43
-
44
-
45
-
46
-
47
-
48
-
49
-
50
-
51
-
52
-
53
-
54
-
55
-
56
-
57
-
58
-
59
-
60
-
61
-
62
-
63
-
64
-
65
-
66
-
67
-
68
-
69
-
70
-
71
-
72
-
73
-
74
-
75
-
76
-
77
-
78
-
79
-
80
-
81
-
82
-
83
-
84
-
85
-
86
-
87
-
 88
88 -
 89
89 -
 90
90 -
 91
91 -
 92
92 -
 93
93 -
 94
94 -
 95
95 -
 96
96 -
 97
97 -
 98
98 -
99
-
100
-
101
-
102
-
103
-
104
-
105
-
106
-
107
-
108
-
109
-
110
-
111
-
112
-
113
-
114
-
115
-
116
-
117
-
118
-
119
-
120
-
121
-
122
-
123
-
124
-
125
-
126
-
127
-
128
-
129
-
130
-
131
-
132
-
133
-
134
-
135
-
136
-
137
-
138
-
139
-
140
-
141
-
142
-
143
-
144
-
145
-
146
-
147
-
148
-
149
-
150
-
151
-
152
-
153
-
154
-
155
-
156
-
157
-
158
-
159
-
160
-
161
-
162
-
163
-
164
-
165
-
166
 |
 |
