HP 6310 User Guide - Page 8
Start Copy Color, Start Copy Black - windows 7
 |
UPC - 882780472747
View all HP 6310 manuals
Add to My Manuals
Save this manual to your list of manuals |
Page 8 highlights
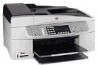
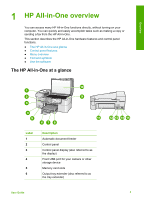
Overview (continued) Label 5 6 7 8 9 10 11 12 13 14 15 16 17 18 19 20 21 22 23 24 25 26 Name and Description Start Fax Black: Starts a black-and-white fax. Start Fax Color: Starts a color fax. One-touch speed dial buttons: Access the first five speed dial numbers. Keypad: Enters fax numbers, values, or text. Attention light: When blinking, the attention light indicates an error that requires your attention has occurred. Setup/?: Presents the Setup Menu for generating reports, changing fax and other maintenance settings, and accessing the Help menu. The topic that you select from the Help menu opens a help window on your computer screen. Left arrow: Decreases values on the display. OK: Selects a menu or a setting on the display. Right arrow: Increases values on the display. Cancel: Stops a job, exits a menu, or exits settings. Start Copy Black: Starts a black-and-white copy job. Start Copy Color: Starts a color copy job. Print Photos: Selects the photo function. Use this button to print photos from a memory card or storage device, or to save photos to your computer. Start Scan: Starts a scan job and sends it to the destination you selected using the Scan To button. Proof Sheet: Prints a proof sheet when a memory card has been inserted in a memory card slot. A proof sheet shows thumbnail views of all the photos on the memory card. You can select photos on the proof sheet, then print those photos by scanning the proof sheet. Scan To: Presents the Scan To menu for selecting a scan destination. Menu in the Photo area: Presents the Photo Menu for selecting options. Quality: Selects Best, Normal, or Fast quality for copying. Reduce/Enlarge: Changes the size of a copy for printing. Menu in the Copy area: Presents the Copy Menu for selecting options. Display: View menus and messages. The functionality of this button depends on the country/region in which the HP Allin-One is sold. The button name is one of the following: Fax Resolution: Adjusts the resolution for the fax you are sending. User Guide 5
-
 1
1 -
2
-
 3
3 -
 4
4 -
 5
5 -
 6
6 -
 7
7 -
 8
8 -
 9
9 -
 10
10 -
 11
11 -
 12
12 -
 13
13 -
14
-
15
-
16
-
17
-
18
-
19
-
20
-
21
-
22
-
23
-
24
-
25
-
26
-
27
-
28
-
29
-
30
-
31
-
32
-
33
-
34
-
35
-
36
-
37
-
38
-
39
-
40
-
41
-
42
-
43
-
44
-
45
-
46
-
47
-
48
-
49
-
50
-
51
-
52
-
53
-
54
-
55
-
56
-
57
-
58
-
59
-
60
-
61
-
62
-
63
-
64
-
65
-
66
-
67
-
68
-
69
-
70
-
71
-
72
-
73
-
74
-
75
-
76
-
77
-
78
-
79
-
80
-
81
-
82
-
83
-
84
-
85
-
86
-
87
-
88
-
89
-
90
-
91
-
92
-
93
-
94
-
95
-
96
-
97
-
98
-
99
-
100
-
101
-
102
-
103
-
104
-
105
-
106
-
107
-
108
-
109
-
110
-
111
-
112
-
113
-
114
-
115
-
116
-
117
-
118
-
119
-
120
-
121
-
122
-
123
-
124
-
125
-
126
-
127
-
128
-
129
-
130
-
131
-
132
-
133
-
134
-
135
-
136
-
137
-
138
-
139
-
140
-
141
-
142
-
143
-
144
-
145
-
146
-
147
-
148
-
149
-
150
-
151
-
152
-
153
-
154
-
155
-
156
-
157
-
158
-
159
-
160
-
161
-
162
-
163
-
164
-
165
-
166
-
167
 |
 |
