HP 6310 User Guide - Page 92
Proof Sheet, Proof Sheet Menu, Print Proof Sheet, Select Photos, Custom - scan to computer
 |
UPC - 882780472747
View all HP 6310 manuals
Add to My Manuals
Save this manual to your list of manuals |
Page 92 highlights
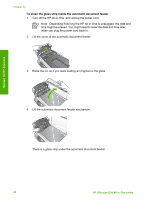
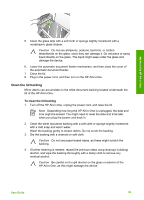
Photos and videos Note 1 You cannot print a proof sheet of photos on a camera in PictBridge mode. The camera must be in storage mode. Note 2 From the control panel on the HP All-in-One, you can only access the following types of image files: JPEG, TIFF, MPEG-1, AVI, and Quicktime. To print other types of files, transfer the files from your memory card or storage device to your computer and use the HP Photosmart Software. In order to print photos from a proof sheet you must complete the following tasks, explained in detail in the procedures below. ● Print a proof sheet of the images on your memory card or storage device ● Complete the proof sheet ● Scan the proof sheet To print a proof sheet 1. Insert a memory card into the appropriate slot on the HP All-in-One, or connect a storage device to the front USB port. 2. In the Photo area, press Proof Sheet, and then press OK. This selects the Proof Sheet Menu and then selects Print Proof Sheet. Note Depending on how many photos are on the memory card, the time it takes to print a proof sheet can vary greatly. 3. If there are more than 20 photos on the card, the Select Photos menu appears. Press to select one of the following: - All - Custom If you select a video, only the first frame of the video will print on the proof sheet. 4. If you choose Custom, press or until the photo number for the first photo appears, then press OK. User Guide 89
-
 1
1 -
2
-
3
-
4
-
5
-
6
-
7
-
8
-
9
-
10
-
11
-
12
-
13
-
14
-
15
-
16
-
17
-
18
-
19
-
20
-
21
-
22
-
23
-
24
-
25
-
26
-
27
-
28
-
29
-
30
-
31
-
32
-
33
-
34
-
35
-
36
-
37
-
38
-
39
-
40
-
41
-
42
-
43
-
44
-
45
-
46
-
47
-
48
-
49
-
50
-
51
-
52
-
53
-
54
-
55
-
56
-
57
-
58
-
59
-
60
-
61
-
62
-
63
-
64
-
65
-
66
-
67
-
68
-
69
-
70
-
71
-
72
-
73
-
74
-
75
-
76
-
77
-
78
-
79
-
80
-
81
-
82
-
83
-
84
-
85
-
86
-
 87
87 -
 88
88 -
 89
89 -
 90
90 -
 91
91 -
 92
92 -
 93
93 -
 94
94 -
 95
95 -
 96
96 -
 97
97 -
98
-
99
-
100
-
101
-
102
-
103
-
104
-
105
-
106
-
107
-
108
-
109
-
110
-
111
-
112
-
113
-
114
-
115
-
116
-
117
-
118
-
119
-
120
-
121
-
122
-
123
-
124
-
125
-
126
-
127
-
128
-
129
-
130
-
131
-
132
-
133
-
134
-
135
-
136
-
137
-
138
-
139
-
140
-
141
-
142
-
143
-
144
-
145
-
146
-
147
-
148
-
149
-
150
-
151
-
152
-
153
-
154
-
155
-
156
-
157
-
158
-
159
-
160
-
161
-
162
-
163
-
164
-
165
-
166
-
167
 |
 |
