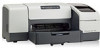
HP Business Inkjet 1000 HP Business Inkjet 1000 - User Guide - Page 25
Performing manual duplexing, To perform manual duplexing (Windows) - lights
 |
View all HP Business Inkjet 1000 manuals
Add to My Manuals
Save this manual to your list of manuals |
Page 25 highlights
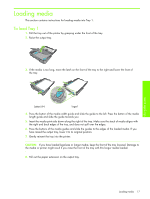
Performing manual duplexing If you want, you can duplex manually. If you have installed an optional auto-duplex unit, leave it in place. You will choose manual duplexing in the printer driver. To perform manual duplexing (Windows) 1. Load the appropriate paper in Tray 1. 2. On the File menu, click Print, and then click Properties. (The actual steps can vary; this is the most common method.) 3. On the Basics tab, select Back to Front under Page Order. 4. On the Finishing tab, select the Print on Both Sides check box. Make sure that the Automatic check box is cleared. 5. When duplexing, the top margin might need to be increased slightly to make sure pages align. Select the Preserve Layout check box to reduce the margins so that the page prints on a single sheet. Clear this check box if you prefer that the page print on more than one sheet with full margins. 6. Select or clear the Flip Pages Up check box depending on which way you want the binding. See the graphics in the printer driver for examples. 7. Click OK to close the dialog box. 8. Click OK to print. 9. Depending on your type of printer connection, do one of the following steps. • For directly connected printers: After the first side prints, a dialog box appears on your computer. Follow the instructions on the screen for reloading the job and then click Continue. • For network-connected printers: When the first side of the job has printed, the Resume light blinks. If the Toolbox is installed, the Toolbox shows a dialog box to show you how to reload the job. 10.Press the (resume button) on the printer. For more information on setting print options, see Changing printer settings. To perform manual duplexing (Mac OS) 1. Load the appropriate paper in Tray 1. 2. On the File menu, click Print. 3. On the Two Sided Printing panel, select the Print Both Sides check box, the binding orientation you want (select the desired icon). 4. On the Paper Type/Quality panel, select Manual from the Source drop-down menu. 5. Click Print to print the document. 6. When the first side of the job has printed, the Resume light blinks. Reload the job into the tray. Be sure to load the paper with the print side up. 7. Press the (resume button) on the printer. 22 Using the printer
-
 1
1 -
2
-
3
-
4
-
5
-
6
-
7
-
8
-
9
-
10
-
11
-
12
-
13
-
14
-
15
-
16
-
17
-
18
-
19
-
 20
20 -
 21
21 -
 22
22 -
 23
23 -
 24
24 -
 25
25 -
 26
26 -
 27
27 -
 28
28 -
 29
29 -
 30
30 -
31
-
32
-
33
-
34
-
35
-
36
-
37
-
38
-
39
-
40
-
41
-
42
-
43
-
44
-
45
-
46
-
47
-
48
-
49
-
50
-
51
-
52
-
53
-
54
-
55
-
56
-
57
-
58
-
59
-
60
-
61
-
62
-
63
-
64
-
65
-
66
-
67
-
68
-
69
-
70
-
71
-
72
-
73
-
74
-
75
-
76
-
77
-
78
-
79
-
80
-
81
-
82
-
83
-
84
-
85
-
86
-
87
-
88
-
89
-
90
-
91
-
92
-
93
-
94
-
95
-
96
 |
 |