HP C4106A HP LaserJet 6L/Companion - (English) Printing Solution UserÂ&r - Page 19
Step 5: Connecting the, Interface Cable
 |
View all HP C4106A manuals
Add to My Manuals
Save this manual to your list of manuals |
Page 19 highlights
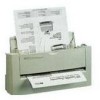
1-10 Set Up Step 5: Connecting the Interface Cable 1 Plug the interface cable that came with your printing solution into the To PC Connector on the HP LaserJet Companion. 2 Plug the opposite end of the interface cable into the parallel port on your computer. Caution Be sure to connect the cable to a parallel port on your computer rather than a serial port. Connecting to the wrong port can cause damage to your printer. See your computer's documentation for more information about the computer's ports. 3 Plug one end of the power supply into the power connector on the HP LaserJet Companion. 4 Plug the other end into a surge protector or wall outlet. 5 Plug one end of the printer's power cord into the back of the printer first, then plug the other end into a surge protector or wall outlet. 6 The parallel cable now connects your printer (C) to the HP LaserJet Companion (B). The interface cable connects the HP LaserJet Companion (B) to your computer (A). Note Once the power is connected, the indicator lights on the printer's Front Panel turn on and then blink in sequence. The Error (top) light stays on if the Paper Input Bin is empty. You will not find an on/off switch on your printer or Companion. After 15 minutes of inactivity, the printer will automatically shift to a powered-down state called SleepMode. EN
-
 1
1 -
2
-
3
-
4
-
5
-
6
-
7
-
8
-
9
-
10
-
11
-
12
-
13
-
 14
14 -
 15
15 -
 16
16 -
 17
17 -
 18
18 -
 19
19 -
 20
20 -
 21
21 -
 22
22 -
 23
23 -
 24
24 -
25
-
26
-
27
-
28
-
29
-
30
-
31
-
32
-
33
-
34
-
35
-
36
-
37
-
38
-
39
-
40
-
41
-
42
-
43
-
44
-
45
-
46
-
47
-
48
-
49
-
50
-
51
-
52
-
53
-
54
-
55
-
56
-
57
-
58
-
59
-
60
-
61
-
62
-
63
-
64
-
65
-
66
-
67
-
68
-
69
-
70
-
71
-
72
-
73
-
74
-
75
-
76
-
77
-
78
-
79
-
80
-
81
-
82
-
83
-
84
-
85
-
86
-
87
-
88
-
89
-
90
-
91
-
92
-
93
-
94
-
95
-
96
-
97
-
98
-
99
-
100
-
101
-
102
-
103
-
104
-
105
-
106
-
107
-
108
-
109
-
110
-
111
-
112
-
113
-
114
-
115
-
116
-
117
-
118
-
119
-
120
-
121
-
122
-
123
-
124
-
125
-
126
 |
 |
