HP C4106A HP LaserJet 6L/Companion - (English) Printing Solution UserÂ&r - Page 43
Using the HP LaserJet Companion, Copier Software
 |
View all HP C4106A manuals
Add to My Manuals
Save this manual to your list of manuals |
Page 43 highlights
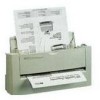
Using the HP LaserJet Companion Copier Software The HP LaserJet Companion Copier software works much like a photocopier in that it allows you to enlarge or reduce the image, control the brightness and contrast, control the number of copies made of an item, and collate copies. Figure 3-2 To send an image to the HP LaserJet Companion Copier software 1 Raise the paper tray and the paper supports. 2 Place the document face forward and top down in the paper tray, and adjust the paper edge guides by sliding them to the edges of the document. 3 Press [To[PC] once. If you need to stop the scan, press [To[PC] again. To remove the document, see "Removing Paper" in chapter 5. The PaperPort software starts automatically. A thumbnail image of the page appears on the PaperPort software as the document is scanned. When the scan is complete, the thumbnail image disappears and the PaperPort software automatically displays the scanned image in the Desktop View. 4 After the scan is complete, select the document on the PaperPort screen. 5 Drag the selected items onto the HP LaserJet Companion Copier link. - Or From the File menu, choose Links and select HP LaserJet Companion Copier link from the submenu. - Or Select the item and click the HP LaserJet Companion Copier link. The HP LaserJet Companion Copier software will start and show a screen where you can adjust the copy quality and quantity. 3-4 Using the HP LaserJet Companion EN
-
 1
1 -
2
-
3
-
4
-
5
-
6
-
7
-
8
-
9
-
10
-
11
-
12
-
13
-
14
-
15
-
16
-
17
-
18
-
19
-
20
-
21
-
22
-
23
-
24
-
25
-
26
-
27
-
28
-
29
-
30
-
31
-
32
-
33
-
34
-
35
-
36
-
37
-
 38
38 -
 39
39 -
 40
40 -
 41
41 -
 42
42 -
 43
43 -
 44
44 -
 45
45 -
 46
46 -
 47
47 -
 48
48 -
49
-
50
-
51
-
52
-
53
-
54
-
55
-
56
-
57
-
58
-
59
-
60
-
61
-
62
-
63
-
64
-
65
-
66
-
67
-
68
-
69
-
70
-
71
-
72
-
73
-
74
-
75
-
76
-
77
-
78
-
79
-
80
-
81
-
82
-
83
-
84
-
85
-
86
-
87
-
88
-
89
-
90
-
91
-
92
-
93
-
94
-
95
-
96
-
97
-
98
-
99
-
100
-
101
-
102
-
103
-
104
-
105
-
106
-
107
-
108
-
109
-
110
-
111
-
112
-
113
-
114
-
115
-
116
-
117
-
118
-
119
-
120
-
121
-
122
-
123
-
124
-
125
-
126
 |
 |
