HP DL320 HP ProLiant DL320 Generation 2 Server Maintenance and Service Guide - Page 53
Re-entering the Server Serial Number, System Options, Serial Number, Enter, Escape
 |
UPC - 829160513218
View all HP DL320 manuals
Add to My Manuals
Save this manual to your list of manuals |
Page 53 highlights
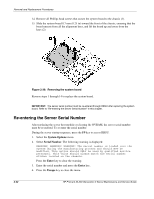
Removal and Replacement Procedures 14. Remove all Phillips head screws that secure the system board to the chassis (1). 15. Slide the system board 0.7 mm (0.25 in) toward the front of the chassis, ensuring that the board unseats from all the alignment keys, and lift the board up and away from the keys (2). Figure 2-36: Removing the system board Reverse steps 1 through 14 to replace the system board. IMPORTANT: The server serial number must be re-entered through RBSU after replacing the system board. Refer to "Re-entering the Server Serial Number" in this chapter. Re-entering the Server Serial Number After replacing the server host module or clearing the NVRAM, the server serial number must be re-entered. To re-enter the serial number: During the server startup sequence, press the F9 key to access RBSU. 1. Select the System Options menu. 2. Select Serial Number. The following warning is displayed: WARNING! WARNING! WARNING! The serial number is loaded into the system during the manufacturing process and should NOT be modified. This option should ONLY be used by qualified service personnel. This value should always match the serial number sticker located on the chassis. Press the Enter key to clear the warning. 3. Enter the serial number and press the Enter key. 4. Press the Escape key to close the menu. 2-42 HP ProLiant DL320 Generation 2 Server Maintenance and Service Guide HP CONFIDENTIAL Codename: Moonstar 306 Part Number: 293164-004 Last Saved On: 9/22/03 1:47 PM
-
 1
1 -
2
-
3
-
4
-
5
-
6
-
7
-
8
-
9
-
10
-
11
-
12
-
13
-
14
-
15
-
16
-
17
-
18
-
19
-
20
-
21
-
22
-
23
-
24
-
25
-
26
-
27
-
28
-
29
-
30
-
31
-
32
-
33
-
34
-
35
-
36
-
37
-
38
-
39
-
40
-
41
-
42
-
43
-
44
-
45
-
46
-
47
-
 48
48 -
 49
49 -
 50
50 -
 51
51 -
 52
52 -
 53
53 -
 54
54 -
 55
55 -
 56
56 -
 57
57 -
 58
58 -
59
-
60
-
61
-
62
-
63
-
64
-
65
-
66
-
67
-
68
-
69
-
70
-
71
-
72
-
73
-
74
-
75
-
76
-
77
-
78
-
79
-
80
-
81
-
82
-
83
 |
 |
