HP Designjet T520 HP Designjet T120 and T520 ePrinter series - Printer assembl - Page 5
Important, Important, Wichtig, Importante, Importante
 |
View all HP Designjet T520 manuals
Add to My Manuals
Save this manual to your list of manuals |
Page 5 highlights
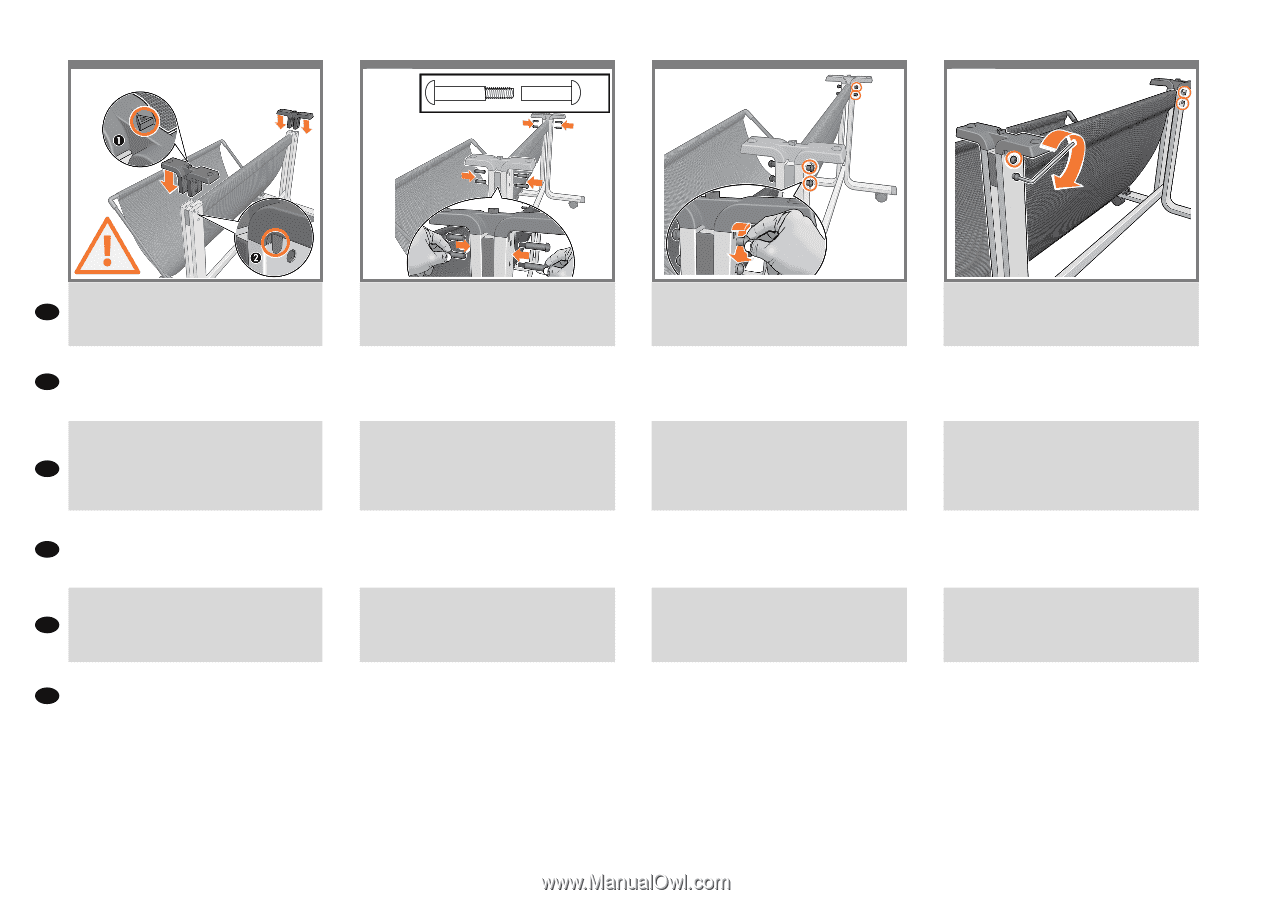
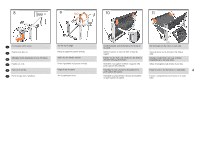
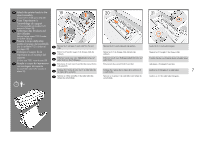
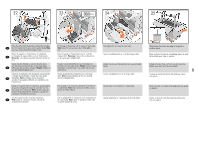
12 13 X4 14 15 X4 IMPORTANT: With the triangles pointing towards the EN basket (1); slot the 2 supports into the stand (1 each side). Push each one down hard into place (2). IMPORTANT : Avec les triangles en direction du panier (1) ; insérez les 2 appuis dans le support (1 de chaque FR côté). Emboîtez-les fortement dans leur emplacement (2). WICHTIG: Achten Sie darauf, dass die Spitzen der Dreiecke auf den Stützen Richtung Korb zeigen (1), und schieben Sie die zwei Stützen in den Ständer (eine DE auf jeder Seite). Drücken Sie diese Stützen so weit wie möglich nach unten (2). IMPORTANTE: con i triangoli rivolti verso il raccoglitore (1), infilare i 2 supporti nel piedistallo (1 IT per lato). Spingerli entrambi in posizione, premendo con decisione (2). IMPORTANTE: con los triángulos apuntando hacia la cesta (1); encaje las 2 piezas de soporte en el soporte ES (1 a cada lado). Empújelas hacia abajo para que queden encajadas (2). IMPORTANTE: Com os triângulos apontando para o compartimento (1); encaixe os 2 suportes no suporte PT (1 de cada lado). Empurre cada um para que se encaixe no lugar (2). Insert 2 special screws and nuts into both sides of the leg (4 total), and tighten by hand. Note: if it is difficult to insert the screws; go back to the previous step, and check the supports are well in place. Insérez 2 écrous spéciaux et des vis dans les deux côtés du pied (4 au total), et serrez manuellement. Remarque : Si vous rencontrez des difficultés pour insérer les vis ; revenez à l'étape précédente, et vérifiez si les appuis sont bien en place. Führen Sie bei beiden Standfüßen jeweils zwei spezielle Schrauben und Muttern ein (insgesamt vier), und drehen Sie diese von Hand fest. Hinweis: Wenn sich die Schrauben nur schwer einführen lassen, überprüfen Sie, ob die im vorherigen Schritt angebrachten Stützen richtig positioniert sind. Inserire 2 viti e dadi speciali in entrambi i lati della gamba (4 in totale) e serrarli a mano. Nota: se risulta difficile inserire le viti, tornare al passaggio precedente e controllare che i supporti siano posizionati correttamente. Inserte 2 tornillos y 2 tuercas especiales a ambos lados de la pata (4 en total) y apriételos a mano. Nota: si tiene dificultad para insertar los tornillos; vuelva al paso anterior y compruebe que los soportes estén bien encajados. Insira 2 parafusos e porcas especiais em ambos os lados do pregador (4 no total) e aperte manualmente. Nota: se for difícil inserir os parafusos; volte para a etapa anterior e verifique se os suportes estão bem colocados no lugar. Tighten the 4 screws by hand (2 each side). Serrez les 4 vis manuellement (2 de chaque côté). Drehen Sie die vier Schrauben von Hand fest (zwei auf jeder Seite). Serrare le 4 viti a mano (2 per lato). Apriete los 4 tornillos a mano (2 a cada lado). Aperte os 4 parafusos manualmente (2 de cada lado). Fully tighten the 4 screws (2 each side). Serrez complètement les 4 vis (2 de chaque côté). Ziehen Sie die vier Schrauben fest an (zwei auf jeder Seite). 5 Serrare completamente le 4 viti (2 per lato). Apriete bien los 4 tornillos (2 a cada lado). Aperte totalmente os 4 parafusos (2 de cada lado).
-
 1
1 -
 2
2 -
 3
3 -
 4
4 -
 5
5 -
 6
6 -
 7
7 -
 8
8 -
 9
9 -
 10
10 -
 11
11 -
12
-
13
-
14
-
15
-
16
-
17
-
18
-
19
-
20
-
21
-
22
-
23
-
24
 |
 |