HP Designjet T520 HP Designjet T120 and T520 ePrinter Series - User's Guide - Page 24
Connect a computer to the printer by USB cable (Windows), Software Installation - firmware update
 |
View all HP Designjet T520 manuals
Add to My Manuals
Save this manual to your list of manuals |
Page 24 highlights
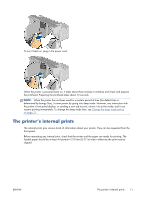
Connect a computer to the printer by USB cable (Windows) You can connect your printer directly to a computer without going through a network, by using the printer's built-in Hi-Speed USB device port. A USB connection may be faster than a network connection, but it has some disadvantages that you should bear in mind: ● The cable is of limited length. ● It is more difficult to share the printer. ● You cannot use Web Services. ● You cannot use automatic firmware updates. NOTE: The use of non-certified USB cables can lead to connectivity problems. Only cables certified by the USB Implementor's Forum (http://www.usb.org/) should be used with this printer. Printer software installation The following instructions apply if you intend to print from software applications using a printer driver. See Printing on page 42 for alternative ways of printing. 1. Do not connect the computer to the printer yet. You must first install the printer software on the computer, as follows. 2. Insert the HP Start-up Kit DVD into your DVD drive. If the DVD does not start automatically, run the setup.exe program in the root folder of the DVD. 3. Navigate to the Software Installation button and press it. 4. Press the Install Software button. 5. In some cases, you may see a message warning you that the installer would need to communicate through the firewall in order to search the network for printers. As you have no need to do this, you can check the box Continue installation without searching the network. 6. If you see a list of networked printers, select Help me find my printer (including network and USB connected printers). 7. Select USB Cable. NOTE: You can connect your printer and complete the installation later if you prefer. To do so, check the box marked I want to connect my printer after completing the setup wizard. 8. When prompted to do so, connect your computer to the printer with a certified USB cable. Ensure that the printer is turned on. 9. Follow the instructions on your screen to install the printer drivers and other HP software, such as the HP Utility. 10. If during the process you have not been prompted to connect the printer, connect the printer now, and let the wizard install the device automatically. 16 Chapter 2 Connecting the printer ENWW
-
 1
1 -
2
-
3
-
4
-
5
-
6
-
7
-
8
-
9
-
10
-
11
-
12
-
13
-
14
-
15
-
16
-
17
-
18
-
 19
19 -
 20
20 -
 21
21 -
 22
22 -
 23
23 -
 24
24 -
 25
25 -
 26
26 -
 27
27 -
 28
28 -
 29
29 -
30
-
31
-
32
-
33
-
34
-
35
-
36
-
37
-
38
-
39
-
40
-
41
-
42
-
43
-
44
-
45
-
46
-
47
-
48
-
49
-
50
-
51
-
52
-
53
-
54
-
55
-
56
-
57
-
58
-
59
-
60
-
61
-
62
-
63
-
64
-
65
-
66
-
67
-
68
-
69
-
70
-
71
-
72
-
73
-
74
-
75
-
76
-
77
-
78
-
79
-
80
-
81
-
82
-
83
-
84
-
85
-
86
-
87
-
88
-
89
-
90
-
91
-
92
-
93
-
94
-
95
-
96
-
97
-
98
-
99
-
100
-
101
-
102
-
103
-
104
-
105
-
106
-
107
-
108
-
109
-
110
-
111
-
112
-
113
-
114
-
115
-
116
-
117
-
118
-
119
-
120
-
121
-
122
-
123
-
124
-
125
-
126
-
127
-
128
-
129
-
130
-
131
-
132
-
133
-
134
-
135
-
136
-
137
-
138
-
139
-
140
-
141
-
142
-
143
-
144
-
145
-
146
-
147
-
148
-
149
-
150
-
151
-
152
-
153
-
154
-
155
-
156
 |
 |