HP Designjet T520 HP Designjet T120 and T520 ePrinter Series - User's Guide - Page 32
Control access to the Embedded Web Server, Set Windows driver preferences, Set up Web Services - 24
 |
View all HP Designjet T520 manuals
Add to My Manuals
Save this manual to your list of manuals |
Page 32 highlights
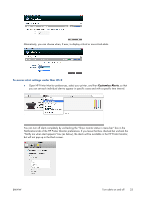
Control access to the Embedded Web Server To prevent users from modifying important device settings, you can set a password in the Embedded Web Server, so that users without the password can see only the Information tabs. Once set, the password is required to view or change any parameters in the other tabs. Set Windows driver preferences You can change some default settings in your printer driver according to your own preferences, for instance to set color emulation or paper-saving options. To do this under Windows 7, for example, press the Start button on your computer's screen, then click Devices and printers, then right-click your printer's icon and select Printing preferences. Any settings you change in the Printing Preferences window will be saved as default values. Set up Web Services Before using Web Services, some setup is required on your printer and your computer. 1. Make sure that your printer is correctly connected to the Internet. 2. Enable Web Services during initial setup of the printer, or later by pressing on the home screen and following the instructions on the front panel. The printer may need to restart if it has updated its firmware. 3. Install the printer software (drivers and other software to enhance your experience) in your computer from the HP Start-up Kit DVD, or from the Web. You can also find documentation and support information on the DVD and on the Web. 4. Create an HP Designjet ePrint & Share account when prompted, or later, at http://www.hp.com/ go/eprintandshare. HP Designjet ePrint & Share saves copies of all your print jobs in the cloud so that you can reprint and share them from almost anywhere, even from smartphones and tablet computers. 5. Activate your account by clicking the activation link that you will receive by email. TIP: If you don't see the message, remember to check your junk email folder. 6. This is an optional step: If you are the printer administrator, log in at the HP ePrint Center (http://www.hp.com/go/eprintcenter) to customize your printer's email address or manage eprinter security for remote printing. Congratulations, you now have completed Web Services setup. HP ePrint and HP Designjet ePrint & Share are ready to use. For the latest information, support, and terms of use of the HP ePrint Center and HP Designjet ePrint & Share, see their respective websites, http://www.hp.com/go/eprintcenter and http://www.hp.com/ go/eprintandshare. 24 Chapter 3 Setting up the printer ENWW
-
 1
1 -
2
-
3
-
4
-
5
-
6
-
7
-
8
-
9
-
10
-
11
-
12
-
13
-
14
-
15
-
16
-
17
-
18
-
19
-
20
-
21
-
22
-
23
-
24
-
25
-
26
-
 27
27 -
 28
28 -
 29
29 -
 30
30 -
 31
31 -
 32
32 -
 33
33 -
 34
34 -
 35
35 -
 36
36 -
 37
37 -
38
-
39
-
40
-
41
-
42
-
43
-
44
-
45
-
46
-
47
-
48
-
49
-
50
-
51
-
52
-
53
-
54
-
55
-
56
-
57
-
58
-
59
-
60
-
61
-
62
-
63
-
64
-
65
-
66
-
67
-
68
-
69
-
70
-
71
-
72
-
73
-
74
-
75
-
76
-
77
-
78
-
79
-
80
-
81
-
82
-
83
-
84
-
85
-
86
-
87
-
88
-
89
-
90
-
91
-
92
-
93
-
94
-
95
-
96
-
97
-
98
-
99
-
100
-
101
-
102
-
103
-
104
-
105
-
106
-
107
-
108
-
109
-
110
-
111
-
112
-
113
-
114
-
115
-
116
-
117
-
118
-
119
-
120
-
121
-
122
-
123
-
124
-
125
-
126
-
127
-
128
-
129
-
130
-
131
-
132
-
133
-
134
-
135
-
136
-
137
-
138
-
139
-
140
-
141
-
142
-
143
-
144
-
145
-
146
-
147
-
148
-
149
-
150
-
151
-
152
-
153
-
154
-
155
-
156
 |
 |