HP Deskjet Ink Advantage All-in-One Printer - K209 User Guide - Page 86
To make sure the print cartridges are installed correctly, Cause
 |
View all HP Deskjet Ink Advantage All-in-One Printer - K209 manuals
Add to My Manuals
Save this manual to your list of manuals |
Page 86 highlights
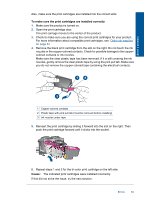
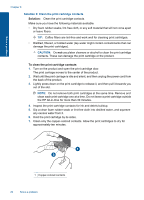
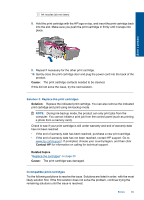
Solve a problem Also, make sure the print cartridges are installed into the correct slots. To make sure the print cartridges are installed correctly 1. Make sure the product is turned on. 2. Open the print cartridge door. The print carriage moves to the center of the product. 3. Check to make sure you are using the correct print cartridges for your product. For more information about compatible print cartridges, see "Order ink supplies" on page 33 4. Remove the black print cartridge from the slot on the right. Do not touch the ink nozzles or the copper-colored contacts. Check for possible damage to the coppercolored contacts or ink nozzles. Make sure the clear plastic tape has been removed. If it is still covering the ink nozzles, gently remove the clear plastic tape by using the pink pull tab. Make sure you do not remove the copper colored tape containing the electrical contacts. 1 Copper-colored contacts 2 Plastic tape with pink pull tab (must be removed before installing) 3 Ink nozzles under tape 5. Reinsert the print cartridge by sliding it forward into the slot on the right. Then push the print cartridge forward until it clicks into the socket. 6. Repeat steps 1 and 2 for the tri-color print cartridge on the left side. Cause: The indicated print cartridges were installed incorrectly. If this did not solve the issue, try the next solution. Errors 83
-
 1
1 -
2
-
3
-
4
-
5
-
6
-
7
-
8
-
9
-
10
-
11
-
12
-
13
-
14
-
15
-
16
-
17
-
18
-
19
-
20
-
21
-
22
-
23
-
24
-
25
-
26
-
27
-
28
-
29
-
30
-
31
-
32
-
33
-
34
-
35
-
36
-
37
-
38
-
39
-
40
-
41
-
42
-
43
-
44
-
45
-
46
-
47
-
48
-
49
-
50
-
51
-
52
-
53
-
54
-
55
-
56
-
57
-
58
-
59
-
60
-
61
-
62
-
63
-
64
-
65
-
66
-
67
-
68
-
69
-
70
-
71
-
72
-
73
-
74
-
75
-
76
-
77
-
78
-
79
-
80
-
 81
81 -
 82
82 -
 83
83 -
 84
84 -
 85
85 -
 86
86 -
 87
87 -
 88
88 -
 89
89 -
 90
90 -
 91
91 -
92
-
93
-
94
-
95
-
96
-
97
-
98
-
99
-
100
-
101
-
102
-
103
-
104
-
105
-
106
-
107
 |
 |
