HP Deskjet Ink Advantage All-in-One Printer - K209 User Guide - Page 88
Incompatible print cartridges, Solution 3: Replace the print cartridges
 |
View all HP Deskjet Ink Advantage All-in-One Printer - K209 manuals
Add to My Manuals
Save this manual to your list of manuals |
Page 88 highlights
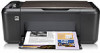
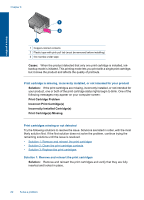
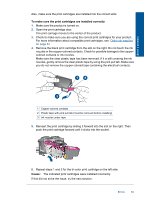
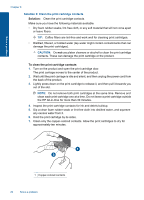
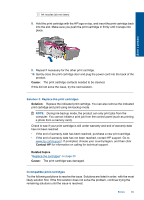
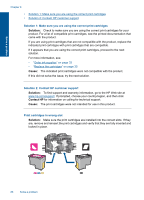
2 Ink nozzles (do not clean) 8. Hold the print cartridge with the HP logo on top, and insert the print cartridge back into the slot. Make sure you push the print cartridge in firmly until it snaps into place. Solve a problem 9. Repeat if necessary for the other print cartridge. 10. Gently close the print cartridge door and plug the power cord into the back of the product. Cause: The print cartridge contacts needed to be cleaned. If this did not solve the issue, try the next solution. Solution 3: Replace the print cartridges Solution: Replace the indicated print cartridge. You can also remove the indicated print cartridge and print using ink-backup mode. NOTE: During ink-backup mode, the product can only print jobs from the computer. You cannot initiate a print job from the control panel (such as printing a photo from a memory card). Check to see if your print cartridge is still under warranty and end of warranty date has not been reached. • If the end of warranty date has been reached, purchase a new print cartridge. • If the end of warranty date has not been reached, contact HP support. Go to www.hp.com/support. If prompted, choose your country/region, and then click Contact HP for information on calling for technical support. Related topics "Replace the cartridges" on page 35 Cause: The print cartridge was damaged. Incompatible print cartridges Try the following solutions to resolve the issue. Solutions are listed in order, with the most likely solution first. If the first solution does not solve the problem, continue trying the remaining solutions until the issue is resolved. Errors 85
-
 1
1 -
2
-
3
-
4
-
5
-
6
-
7
-
8
-
9
-
10
-
11
-
12
-
13
-
14
-
15
-
16
-
17
-
18
-
19
-
20
-
21
-
22
-
23
-
24
-
25
-
26
-
27
-
28
-
29
-
30
-
31
-
32
-
33
-
34
-
35
-
36
-
37
-
38
-
39
-
40
-
41
-
42
-
43
-
44
-
45
-
46
-
47
-
48
-
49
-
50
-
51
-
52
-
53
-
54
-
55
-
56
-
57
-
58
-
59
-
60
-
61
-
62
-
63
-
64
-
65
-
66
-
67
-
68
-
69
-
70
-
71
-
72
-
73
-
74
-
75
-
76
-
77
-
78
-
79
-
80
-
81
-
82
-
 83
83 -
 84
84 -
 85
85 -
 86
86 -
 87
87 -
 88
88 -
 89
89 -
 90
90 -
 91
91 -
 92
92 -
 93
93 -
94
-
95
-
96
-
97
-
98
-
99
-
100
-
101
-
102
-
103
-
104
-
105
-
106
-
107
 |
 |