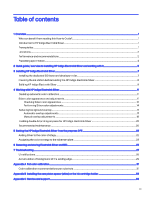
HP Indigo WS6600 Working with Indigo ElectroInk SilverHow-to Guide - Page 7
Bypasses, > Processes, Auto Bias Wizard, perform Full Color Calibration FCC.
 |
View all HP Indigo WS6600 manuals
Add to My Manuals
Save this manual to your list of manuals |
Page 7 highlights
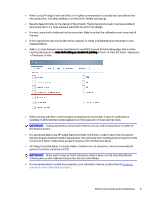
● When using HP Indigo ElectroInk Silver, it is highly recommended to carefully test jobs before first time production, including labeling or lamination (in flexible packaging). ● Results depend mainly on the design of the artwork. The background is likely to be more visible in jobs where there is a large exposed substrate as part of the design. ● It is very important to calibrate the ink accurately. Make sure that the calibration can is emptied all the way. ● Silver separations are usually defined last (except for white, and depending on the graphics and required effect). ● Add a null cycle between silver separations to avoid BID bounce at the leading edge. Add a null by clearing the bypass for Auto-Null adding on double-hit printing in the Print Care (CE level) > Bypasses > Processes screen. ● When printing with Silver, a low background appearance is possible. A specific calibration is available to eliminate the double appearance of background in frame-overlap areas. IMPORTANT: Overlap prevention will not work if there is no null, and it is more likely to suffer for BID bounce issues. ● It is recommended to use HP Indigo ElectroInk Silver with 2 hits in order to reach the OD (optical density) targets and best metallic appearance. The optimized color working point is based on 2 hits of ElectroInk Silver. Calibrations are performed on 2 hits of ElectroInk Silver. ● HP Indigo ElectroInk Silver is visually stable, therefore it is not necessary / not recommended to perform Full Color Calibration (FCC). IMPORTANT: When performing Full Color Calibration without silver, run the Auto Bias Wizard following every color calibration (important for ElectroInk Silver). ● It is recommended to disable the automatic color calibration feature, as described in Disabling automatic color calibration on page 11. Performance and recommendations 3
-
 1
1 -
 2
2 -
 3
3 -
 4
4 -
 5
5 -
 6
6 -
 7
7 -
 8
8 -
 9
9 -
 10
10 -
 11
11 -
 12
12 -
13
-
14
-
15
-
16
-
17
-
18
-
19
-
20
-
21
-
22
-
23
-
24
-
25
-
26
-
27
-
28
-
29
-
30
-
31
-
32
-
33
-
34
-
35
-
36
-
37
-
38
-
39
-
40
-
41
-
42
-
43
-
44
-
45
 |
 |
