HP LD4200tm HP LD4200tm LCD Monitor User Guide - Page 18
Identifying Rear Components - manual
 |
View all HP LD4200tm manuals
Add to My Manuals
Save this manual to your list of manuals |
Page 18 highlights
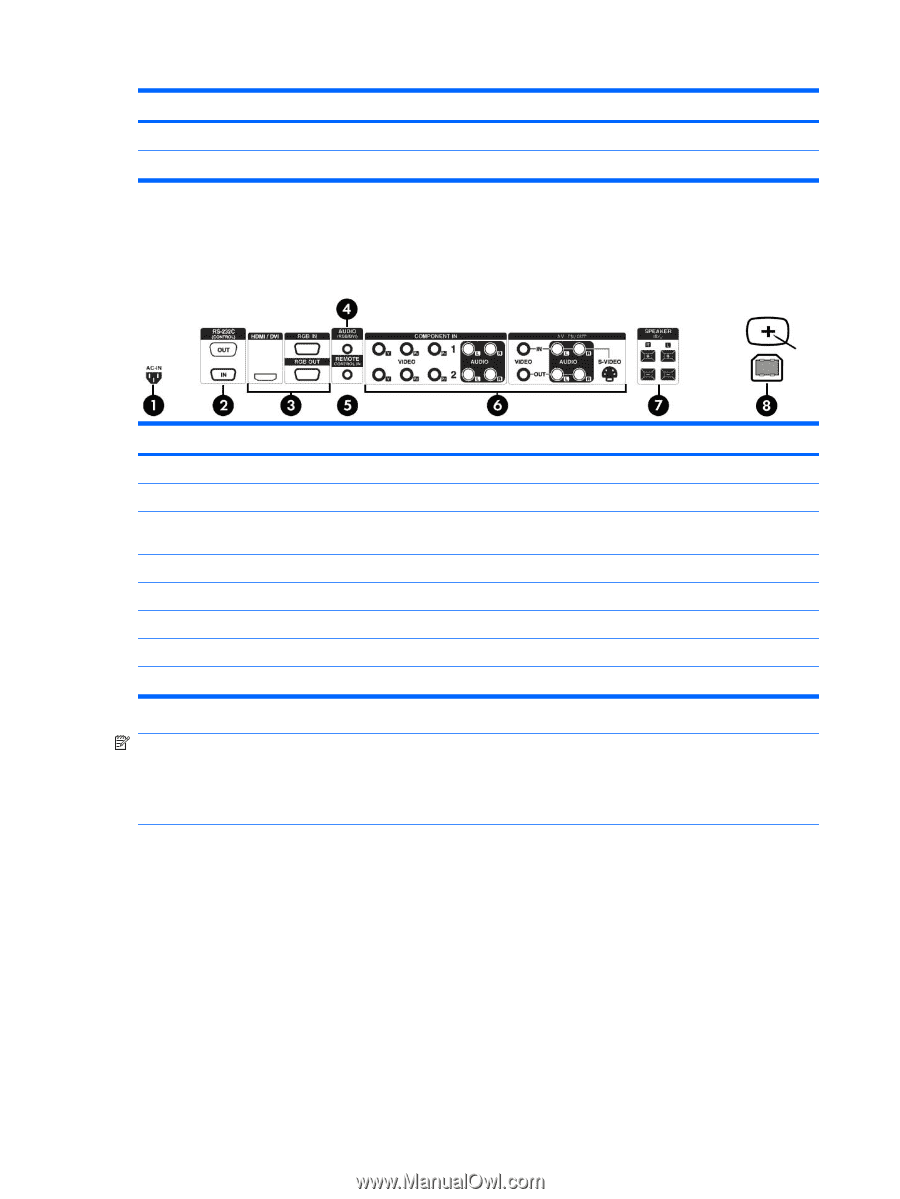
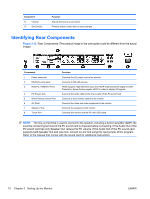
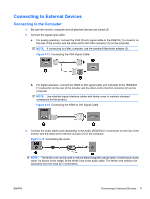
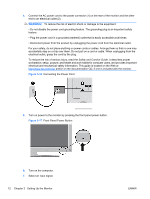
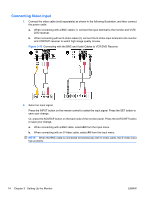
Component 12 Volume 13 Set (Check) Function Adjusts the sound up and down. Press to select a menu item or save changes. Identifying Rear Components Figure 3-12 Rear Components (The product image in the user guide could be different from the actual image) Component 1 Power connector 2 RS-232C serial ports 3 RGB PC, HDMI/DVI Ports 4 PC Sound Jack 5 Wired Remote Control Port 6 AV Ports 7 Speaker Ports 8 Touch Port Function Connects the AC power cord to the monitor Connects to RS-232 devices HDMI supports High Definition input and HDCP (High-bandwidth Digital Content Protection). Some devices require HDCP in order to display HD signals Connects the audio cable to the line-out jack of the PC sound card Connects a wired remote control to the monitor Connects the video and audio equipment to the monitor Connects the speakers to the monitor Connects the monitor and the PC with USB cable NOTE: The line-out terminal is used to connect to the speaker, including a built-in amplifier (AMP). Be sure the connecting terminal of the PC sound card is checked before connecting. If the Audio Out of the PC sound card has only Speaker Out, reduce the PC volume. If the Audio Out of the PC sound card supports both Speaker Out and Line Out, convert to Line Out using the card jumper of the program. Refer to the manual that comes with the sound card for additional instructions. 10 Chapter 3 Setting Up the Monitor ENWW
-
 1
1 -
2
-
3
-
4
-
5
-
6
-
7
-
8
-
9
-
10
-
11
-
12
-
 13
13 -
 14
14 -
 15
15 -
 16
16 -
 17
17 -
 18
18 -
 19
19 -
 20
20 -
 21
21 -
 22
22 -
 23
23 -
24
-
25
-
26
-
27
-
28
-
29
-
30
-
31
-
32
-
33
-
34
-
35
-
36
-
37
-
38
-
39
-
40
-
41
-
42
-
43
-
44
-
45
-
46
-
47
-
48
-
49
-
50
-
51
-
52
-
53
-
54
-
55
-
56
-
57
-
58
-
59
-
60
-
61
-
62
-
63
-
64
-
65
-
66
-
67
-
68
-
69
-
70
-
71
-
72
-
73
-
74
-
75
-
76
-
77
-
78
-
79
-
80
-
81
-
82
-
83
-
84
 |
 |