HP LD4200tm HP LD4200tm LCD Monitor User Guide - Page 42
Start, Start> All Programs > Touch Click Control, Touch Calibration, Coordinate Correction - touch screen
 |
View all HP LD4200tm manuals
Add to My Manuals
Save this manual to your list of manuals |
Page 42 highlights
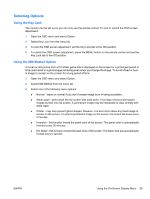
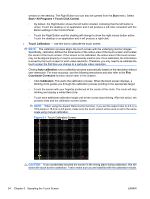
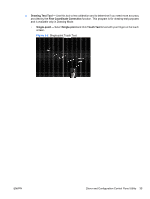
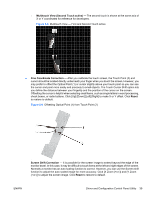
window on the desktop. The Right Button tool can also be opened from the Start menu. Select Start> All Programs > Touch Click Control. ◦ By default, the Right Button shows the left button shaded, indicating that the left button is active. Touch the desktop or an application and it will produce a left-click consistent with the Button settings in the Control Panel. ◦ Touch the Right Button and the shading will change to show the right mouse button active. Touch the desktop or an application and it will produce a right-click. ● Touch Calibration - Use this tool to calibrate the touch screen. NOTE: The calibration process aligns the touch screen with the underlying monitor images. Specifically, calibration defines the dimensions of the active area of the touch screen and locates the center of the touch screen. If the screen is not calibrated, the active area of the touch screen may not be aligned properly or may be unnecessarily small in size. Once calibrated, the information is saved by the touch screen for each video resolution. Therefore, you only need to re-calibrate the touch screen the first time you change to a particular video resolution. Clicking Auto calibration runs a calibration process automatically based on the resolution without user interaction. For more accuracy, use the following instructions and also refer to the Fine Coordinate Correction function section later in this chapter. ◦ Click Calibration. This starts the calibration process. When the black screen displays, a blinking circle guides you through the calibration process pointing to the appropriate target. ◦ Touch the screen with your fingertip positioned at the center of the circle. The circle will stop blinking and display a white filled circle. ◦ Touch each additional calibration target until all the circles stop blinking. After this action, the process ends and the calibration screen closes. NOTE: When using the Aspect Ratio Control function, if you set the aspect ratio to 4:3 on a 16:9 panel or 16.9 on a 4:3 panel, make sure the touch screen active area is set to the same scale using manual calibration. Figure 5-1 Touch Calibration Screen CAUTION: If you accidentally touched the screen in the wrong place during calibration, this will distort the touch screen calibration. Test to make sure you are satisfied with the calibration results. 34 Chapter 5 Operating the Touch Screen ENWW
-
 1
1 -
2
-
3
-
4
-
5
-
6
-
7
-
8
-
9
-
10
-
11
-
12
-
13
-
14
-
15
-
16
-
17
-
18
-
19
-
20
-
21
-
22
-
23
-
24
-
25
-
26
-
27
-
28
-
29
-
30
-
31
-
32
-
33
-
34
-
35
-
36
-
 37
37 -
 38
38 -
 39
39 -
 40
40 -
 41
41 -
 42
42 -
 43
43 -
 44
44 -
 45
45 -
 46
46 -
 47
47 -
48
-
49
-
50
-
51
-
52
-
53
-
54
-
55
-
56
-
57
-
58
-
59
-
60
-
61
-
62
-
63
-
64
-
65
-
66
-
67
-
68
-
69
-
70
-
71
-
72
-
73
-
74
-
75
-
76
-
77
-
78
-
79
-
80
-
81
-
82
-
83
-
84
 |
 |