HP LH4r HP Netserver Service Handbook, Volume 2 - Mid - Page 133
HP NetServer LM System Updates
 |
View all HP LH4r manuals
Add to My Manuals
Save this manual to your list of manuals |
Page 133 highlights
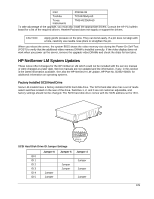
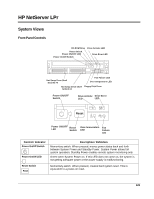
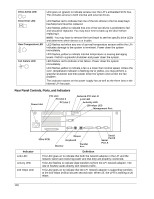
Intel P21014-06 Toshiba TC514256Ap-60 Texas Instruments TMS44C256N-60 To take advantage of the upgrade, you must also install the appropriate drivers. Consult the HP PC bulletin board for a list of the required drivers. Hewlett-Packard does not supply or support the drivers. CAUTION Apply gentle pressure on the pins. They can bend easily. If a pin does not align with a hole, carefully use needle-nose pliers to straighten the pin. When you reboot the server, the system BIOS shows the video memory size during the Power-On Self-Test (POST) to verify that the additional video memory DRAM is installed correctly. If the video display does not work when you power up the server, remove the upgrade video DRAMs and check the chips for bent pins. HP NetServer LM System Updates These notes reflect changes for the HP NetServer LM which could not be included with the service manual or were changed at a later date. Service manuals are not updated and the information, if any, in this section is the latest information available. See also the HP NetServer LM Update, HP Part No. D2332-90009, for additional information on operating systems. Factory Installed SCSI Hard Drive Some LM models have a factory installed SCSI hard disk drive. The SCSI hard disk drive has a set of mode select switches located on the rear of the drive. Switches 1, 2, and 3 are not customer adjustable, and factory settings should not be changed. The SCSI hard disk drive comes with the SCSI address set for ID 0. 654 321 SCSI ID SCSI Hard Disk Drive ID Jumper Settings Jumper 6 Jumper 5 ID 0 ID 1 ID 2 Jumper ID 3 Jumper ID 4 Jumper ID 5 Jumper Jumper 4 Jumper Jumper Jumper 125
-
 1
1 -
2
-
3
-
4
-
5
-
6
-
7
-
8
-
9
-
10
-
11
-
12
-
13
-
14
-
15
-
16
-
17
-
18
-
19
-
20
-
21
-
22
-
23
-
24
-
25
-
26
-
27
-
28
-
29
-
30
-
31
-
32
-
33
-
34
-
35
-
36
-
37
-
38
-
39
-
40
-
41
-
42
-
43
-
44
-
45
-
46
-
47
-
48
-
49
-
50
-
51
-
52
-
53
-
54
-
55
-
56
-
57
-
58
-
59
-
60
-
61
-
62
-
63
-
64
-
65
-
66
-
67
-
68
-
69
-
70
-
71
-
72
-
73
-
74
-
75
-
76
-
77
-
78
-
79
-
80
-
81
-
82
-
83
-
84
-
85
-
86
-
87
-
88
-
89
-
90
-
91
-
92
-
93
-
94
-
95
-
96
-
97
-
98
-
99
-
100
-
101
-
102
-
103
-
104
-
105
-
106
-
107
-
108
-
109
-
110
-
111
-
112
-
113
-
114
-
115
-
116
-
117
-
118
-
119
-
120
-
121
-
122
-
123
-
124
-
125
-
126
-
127
-
 128
128 -
 129
129 -
 130
130 -
 131
131 -
 132
132 -
 133
133 -
 134
134 -
 135
135 -
 136
136 -
 137
137 -
 138
138 -
139
-
140
-
141
-
142
-
143
-
144
-
145
-
146
-
147
-
148
-
149
-
150
-
151
-
152
-
153
-
154
-
155
-
156
-
157
-
158
-
159
-
160
-
161
-
162
-
163
-
164
-
165
-
166
-
167
-
168
-
169
-
170
-
171
-
172
-
173
-
174
-
175
-
176
-
177
-
178
 |
 |
