HP Neoware e140 Neoware Image Manager 4.6 User Manual - Page 104
Boot Inserter window. Clicking the, bootable. When such a risk exists
 |
View all HP Neoware e140 manuals
Add to My Manuals
Save this manual to your list of manuals |
Page 104 highlights
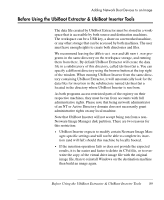
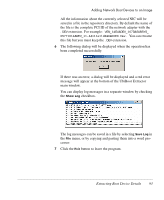
Adding Network Boot Devices to an Image 'Normal' (an image with a CVol file that will still be accessible at the next reboot - the common image file itself must then be modified using the CVolMerge tool), or 'Admin' (we recommend that you create a backup copy of the image before making changes to it in Admin mode). The UbiBoot Inserter dialog lists the descriptions of any bootable NIC data files stored in the UbiBootData directory to enable you to select the one to insert in the image. If the extracted data you want to insert are not in the default UbiBootData directory, you can select another directory using the browse button at the top right of the UbiBoot Inserter window. Clicking the Insert button once a selection is made will cause the information contained in the bootable NIC data file to be inserted either in the CVol file or the image file, depending on the writing mode of the virtual disk currently running. Usually you would need to run UbiBoot Extractor and UbiBoot Inserter from the same operating system and service pack configuration. If the operating systems are too different then you might be able to extract and insert data, but the resulting image might not be bootable. When such a risk exists, UbiBoot Inserter displays the suspicious devices in red. For example, using UbiBoot Extractor on Windows 2000 sp4 then inserting the extracted data running UbiBoot Inserter on Windows XP sp2 is a hazardous operation for the Windows XP sp2 image. If you still decide to insert the data, UbiBoot Inserter will warn you that such an operation is not supported and will display a confirmation dialog requesting user confirmation. UbiBoot Extractor and Inserter come with pre-extracted data for some Neoware thin clients, so that you do not even need to perform the extraction step to add hardware support for these devices into existing Neoware Image Manager virtual disks. Extra pre-extracted data may be available from Neoware technical support on request. 88 Overview
-
 1
1 -
2
-
3
-
4
-
5
-
6
-
7
-
8
-
9
-
10
-
11
-
12
-
13
-
14
-
15
-
16
-
17
-
18
-
19
-
20
-
21
-
22
-
23
-
24
-
25
-
26
-
27
-
28
-
29
-
30
-
31
-
32
-
33
-
34
-
35
-
36
-
37
-
38
-
39
-
40
-
41
-
42
-
43
-
44
-
45
-
46
-
47
-
48
-
49
-
50
-
51
-
52
-
53
-
54
-
55
-
56
-
57
-
58
-
59
-
60
-
61
-
62
-
63
-
64
-
65
-
66
-
67
-
68
-
69
-
70
-
71
-
72
-
73
-
74
-
75
-
76
-
77
-
78
-
79
-
80
-
81
-
82
-
83
-
84
-
85
-
86
-
87
-
88
-
89
-
90
-
91
-
92
-
93
-
94
-
95
-
96
-
97
-
98
-
 99
99 -
 100
100 -
 101
101 -
 102
102 -
 103
103 -
 104
104 -
 105
105 -
 106
106 -
 107
107 -
 108
108 -
 109
109 -
110
-
111
-
112
-
113
-
114
-
115
-
116
-
117
-
118
-
119
-
120
-
121
-
122
-
123
-
124
-
125
-
126
-
127
-
128
-
129
-
130
-
131
-
132
-
133
-
134
-
135
-
136
-
137
-
138
-
139
-
140
-
141
-
142
-
143
-
144
-
145
-
146
-
147
-
148
-
149
-
150
-
151
-
152
-
153
-
154
-
155
-
156
-
157
-
158
-
159
-
160
-
161
-
162
-
163
-
164
-
165
-
166
-
167
-
168
-
169
-
170
-
171
-
172
-
173
-
174
-
175
-
176
-
177
-
178
-
179
-
180
-
181
-
182
-
183
-
184
-
185
-
186
-
187
-
188
-
189
-
190
-
191
-
192
-
193
-
194
-
195
-
196
-
197
-
198
-
199
-
200
-
201
-
202
-
203
-
204
-
205
-
206
-
207
-
208
-
209
-
210
-
211
-
212
-
213
-
214
-
215
-
216
-
217
-
218
-
219
-
220
-
221
-
222
-
223
-
224
-
225
-
226
-
227
-
228
-
229
-
230
-
231
-
232
-
233
-
234
-
235
-
236
-
237
-
238
-
239
-
240
-
241
-
242
-
243
-
244
-
245
-
246
-
247
-
248
-
249
-
250
-
251
-
252
-
253
-
254
-
255
-
256
-
257
-
258
-
259
-
260
-
261
-
262
-
263
-
264
-
265
-
266
-
267
-
268
-
269
-
270
-
271
-
272
-
273
-
274
-
275
-
276
-
277
-
278
-
279
-
280
-
281
-
282
-
283
-
284
-
285
-
286
-
287
-
288
-
289
-
290
-
291
-
292
-
293
-
294
-
295
-
296
-
297
-
298
-
299
-
300
-
301
-
302
-
303
-
304
-
305
-
306
-
307
-
308
-
309
-
310
-
311
-
312
-
313
-
314
-
315
-
316
-
317
-
318
-
319
-
320
-
321
-
322
-
323
-
324
-
325
-
326
-
327
-
328
-
329
-
330
-
331
-
332
-
333
-
334
-
335
-
336
-
337
-
338
-
339
-
340
-
341
-
342
-
343
-
344
-
345
-
346
-
347
-
348
-
349
-
350
-
351
-
352
-
353
-
354
-
355
-
356
-
357
-
358
-
359
-
360
-
361
-
362
-
363
-
364
-
365
-
366
-
367
-
368
-
369
-
370
-
371
-
372
-
373
-
374
-
375
-
376
-
377
-
378
-
379
-
380
-
381
-
382
-
383
-
384
-
385
-
386
-
387
-
388
-
389
-
390
-
391
-
392
-
393
-
394
-
395
-
396
-
397
-
398
-
399
-
400
-
401
-
402
-
403
-
404
-
405
-
406
 |
 |