HP PSC 2350 User Guide - Page 45
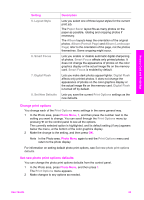
Use the print options menu to set photo print options, Fit
 |
View all HP PSC 2350 manuals
Add to My Manuals
Save this manual to your list of manuals |
Page 45 highlights
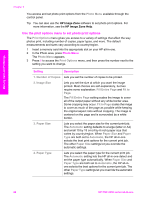
Memory Card and PictBridge Chapter 6 You access and set photo print options from the Photo Menu available through the control panel. Tip You can also use the HP Image Zone software to set photo print options. For more information, see the HP Image Zone Help. Use the print options menu to set photo print options The Print Options menu gives you access to a variety of settings that affect the way photos print, including number of copies, paper types, and more. The default measurements and sizes vary according to country/region. 1 Insert a memory card into the appropriate slot on your HP all-in-one. 2 In the Photo area, press Photo Menu. The Photo Menu appears. 3 Press 1 to access the Print Options menu, and then press the number next to the setting you want to change. Setting Description 1. Number of Copies Lets you set the number of copies to be printed. 2. Image Size Lets you set the size at which you want the image printed. Most choices are self-explanatory, but two require some explanation: Fill Entire Page and Fit to Page. The Fill Entire Page setting scales the image to cover all of the output paper without any white border area. Some cropping may occur. Fit to Page scales the image to cover as much of the page as possible while keeping the original aspect ratio without cropping. The image is centered on the page and is surrounded by a white border. 3. Paper Size Lets you select the paper size for the current print job. The Automatic setting defaults to a large (letter or A4) and small 10 by 15 cm (4 by 6 inch) paper size that varies by country/region. When Paper Size and Paper Type are both set to Automatic, the HP all-in-one selects the best print options for the current print job. The other Paper Size settings let you override the automatic settings. 4. Paper Type Lets you select the paper type for the current print job. The Automatic setting lets the HP all-in-one detect and set the paper type automatically. When Paper Size and Paper Type are both set to Automatic, the HP all-inone selects the best options for the current print job. The other Paper Type settings let you override the automatic settings. 42 HP PSC 2350 series all-in-one
-
 1
1 -
2
-
3
-
4
-
5
-
6
-
7
-
8
-
9
-
10
-
11
-
12
-
13
-
14
-
15
-
16
-
17
-
18
-
19
-
20
-
21
-
22
-
23
-
24
-
25
-
26
-
27
-
28
-
29
-
30
-
31
-
32
-
33
-
34
-
35
-
36
-
37
-
38
-
39
-
 40
40 -
 41
41 -
 42
42 -
 43
43 -
 44
44 -
 45
45 -
 46
46 -
 47
47 -
 48
48 -
 49
49 -
 50
50 -
51
-
52
-
53
-
54
-
55
-
56
-
57
-
58
-
59
-
60
-
61
-
62
-
63
-
64
-
65
-
66
-
67
-
68
-
69
-
70
-
71
-
72
-
73
-
74
-
75
-
76
-
77
-
78
-
79
-
80
-
81
-
82
-
83
-
84
-
85
-
86
-
87
-
88
-
89
-
90
-
91
-
92
-
93
-
94
-
95
-
96
-
97
-
98
-
99
-
100
-
101
-
102
-
103
-
104
-
105
-
106
-
107
-
108
-
109
-
110
-
111
-
112
-
113
-
114
-
115
-
116
-
117
-
118
-
119
-
120
-
121
-
122
-
123
-
124
-
125
-
126
-
127
-
128
-
129
-
130
-
131
-
132
-
133
-
134
-
135
-
136
 |
 |