HP Pavilion a1300 Getting Started Guide - Page 44
Enabling digital audio output with Multi-channel Sound Manager (optional)
 |
View all HP Pavilion a1300 manuals
Add to My Manuals
Save this manual to your list of manuals |
Page 44 highlights
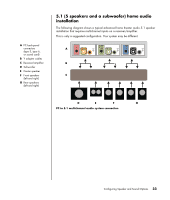
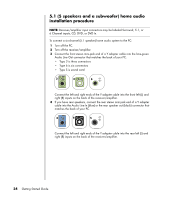
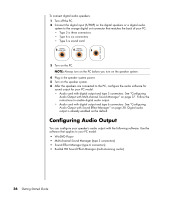
7 Click OK. 8 Test the speakers. Click the Speaker Test tab. Follow the instructions. 9 Configure audio output for the WinDVD Player. See "Configuring Audio for WinDVD Player" on page 47. Enabling digital audio output with Multi-channel Sound Manager (optional) Your PC must include a digital audio out connector on the back panel. To enable digital audio output: 1 Follow steps 1 through 5 of the previous procedure, "Configuring Audio Output with Multi-channel Sound Manager." 2 Place a check next to Enable digital audio output. The Output digital and analog option is automatically selected. 3 Connect the digital audio output connector on the back of your PC to your home audio system's digital audio input. 4 Select your stereo system's digital audio input. 5 Click OK. 6 Test the speakers, by playing a CD, for example. (If you test using a DVD, you need to configure WinDVD first. See "Configuring Audio for WinDVD Player" on page 47.) 7 Configure audio output for the WinDVD Player. See "Configuring Audio for WinDVD Player" on page 47. If you select Enable digital audio output, the microphone volume setting becomes not muted, and the recording source is fixed in Stereo Mix. If you place the microphone too close to the speakers, feedback can occur. Configuring Audio Output with Sound Effect Manager Follow these steps after you have installed and connected your speakers, if your PC model has type 6 connectors. NOTE: A connector with no descriptive text in the Connection Guide indicates that the connector is not used for the selected speaker configuration. 1 Click Start on the taskbar. 2 Click Control Panel. 3 Click Sounds, and then Speech and Audio Devices (or Sounds and Audio Devices). 38 Getting Started Guide
-
 1
1 -
2
-
3
-
4
-
5
-
6
-
7
-
8
-
9
-
10
-
11
-
12
-
13
-
14
-
15
-
16
-
17
-
18
-
19
-
20
-
21
-
22
-
23
-
24
-
25
-
26
-
27
-
28
-
29
-
30
-
31
-
32
-
33
-
34
-
35
-
36
-
37
-
38
-
 39
39 -
 40
40 -
 41
41 -
 42
42 -
 43
43 -
 44
44 -
 45
45 -
 46
46 -
 47
47 -
 48
48 -
 49
49 -
50
-
51
-
52
-
53
-
54
-
55
-
56
-
57
-
58
-
59
-
60
-
61
-
62
-
63
-
64
-
65
-
66
-
67
-
68
-
69
-
70
-
71
-
72
-
73
-
74
-
75
-
76
-
77
-
78
-
79
-
80
-
81
-
82
-
83
-
84
-
85
-
86
-
87
-
88
-
89
-
90
-
91
-
92
-
93
-
94
-
95
-
96
-
97
-
98
-
99
-
100
-
101
-
102
-
103
-
104
-
105
-
106
-
107
-
108
-
109
-
110
-
111
-
112
-
113
-
114
-
115
-
116
 |
 |