HP Pavilion n6398 HP Pavilion Notebook PC N6000 Series - Reference Guide - Page 70
To connect a printer or other parallel device
 |
View all HP Pavilion n6398 manuals
Add to My Manuals
Save this manual to your list of manuals |
Page 70 highlights
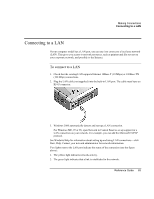
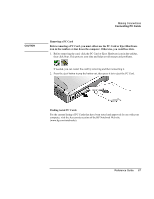
Making Connections Connecting External Devices Using dual display mode (Windows ME or 98) You can extend your desktop by connecting an external monitor to your computer. 1. Click Start, Settings, Control Panel. 2. Double-click Display and click the Settings tab. 3. Right-click display 2, and select Enabled. You can set different resolutions and numbers of colors for each display. However, using the Extended Desktop requires video memory to be shared. For this reason, higher resolutions and higher numbers of colors may cause unexpected behavior on the displays. We recommend starting with 1024 × 768 resolution on the external display and 64K colors (16-bit) on both displays. You can try higher settings to see whether they work for your applications. In addition, certain operations such as playing DVDs and running 3D graphics require extra video memory, so you may have to use lower display settings. Changing display actions For an OmniBook model with a display connected, you can use the BIOS Setup utility to change certain display behaviors, such as stretching the image to fill the screen at lower resolutions. See "To run the BIOS Setup utility" on page 78. For a display connected to a video adapter in a docking system, the docking display is automatically selected when it is detected. To change this behavior, change the Primary Video Adapter setting in BIOS Setup. To connect a printer or other parallel device The computer's parallel port uses a standard 25-pin connector, most commonly used for connecting dot-matrix, ink-jet, and laser printers. You can also use it to connect a parallel Zip drive. • Connect the cable from the parallel printer or other parallel device to the computer's parallel port. 70 Reference Guide
-
 1
1 -
2
-
3
-
4
-
5
-
6
-
7
-
8
-
9
-
10
-
11
-
12
-
13
-
14
-
15
-
16
-
17
-
18
-
19
-
20
-
21
-
22
-
23
-
24
-
25
-
26
-
27
-
28
-
29
-
30
-
31
-
32
-
33
-
34
-
35
-
36
-
37
-
38
-
39
-
40
-
41
-
42
-
43
-
44
-
45
-
46
-
47
-
48
-
49
-
50
-
51
-
52
-
53
-
54
-
55
-
56
-
57
-
58
-
59
-
60
-
61
-
62
-
63
-
64
-
 65
65 -
 66
66 -
 67
67 -
 68
68 -
 69
69 -
 70
70 -
 71
71 -
 72
72 -
 73
73 -
 74
74 -
 75
75 -
76
-
77
-
78
-
79
-
80
-
81
-
82
-
83
-
84
-
85
-
86
-
87
-
88
-
89
-
90
-
91
-
92
-
93
-
94
-
95
-
96
-
97
-
98
-
99
-
100
-
101
-
102
-
103
-
104
-
105
-
106
-
107
-
108
-
109
-
110
-
111
-
112
-
113
-
114
-
115
-
116
-
117
-
118
-
119
-
120
-
121
-
122
-
123
-
124
-
125
-
126
-
127
-
128
-
129
-
130
-
131
-
132
-
133
-
134
-
135
-
136
-
137
-
138
-
139
-
140
-
141
-
142
-
143
-
144
-
145
-
146
-
147
-
148
-
149
-
150
-
151
-
152
 |
 |