HP Photosmart A530 User Guide - Page 21
Creative options, Enhance your photos, To access Design Gallery, Design Gallery, Print, Cancel - h p printer series
 |
View all HP Photosmart A530 manuals
Add to My Manuals
Save this manual to your list of manuals |
Page 21 highlights
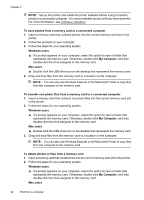
2. Have the device search for available Bluetooth printers. 3. Select the HP Photosmart A530 series printer when it appears on the device. 4. Send the print job from the Bluetooth device to the printer. See the documentation for your Bluetooth device for specific instructions on starting a print job. NOTE: For more information on Bluetooth wireless technology and HP, go to www.hp.com/go/bluetooth. Creative options Change the mood and impact of a photo by applying a Design Gallery effect or color tint. The Sepia color effect applies brown tones similar to those seen in photos produced in the early 1900s. For a hand-tinted effect, try the Antique color option. For a classic, dramatic effect, convert a color photo to grayscale (Black and White). To access Design Gallery 1. Insert a memory card. 2. Display the photo you want to print. 3. Press the Menu button. 4. Press or to highlight Design Gallery. 5. Press Print to open the Design Gallery menu of creative options. 6. Press or to scroll through the menu options. 7. Press Print to select an option. 8. Press Cancel to exit the menu. To remove a Design Gallery effect 1. Insert a memory card. 2. Display the photo you want to print. 3. Press the Menu button. 4. Press or to highlight Design Gallery. 5. Press Print to open the Design Gallery menu of creative options. 6. Press or to highlight No Effect. 7. Press Print to remove the effect. Enhance your photos Your HP Photosmart A530 series includes two on-board features for enhancing your images: red-eye reduction and Photo Fix. The red-eye reduction feature is on by default when you turn on the printer for the first time. It reduces the red-eye effect that sometimes occurs in flash photos. If you want to print a photo without removing red eye, turn off Red Eye from the Tools menu. See Printer menus for more information. Photo Fix automatically enhances your photos using HP Real Life Technologies that: • Sharpen photos. • Improve the dark areas of a photo without affecting the light areas of a photo. Enhance your photos 19
-
 1
1 -
2
-
3
-
4
-
5
-
6
-
7
-
8
-
9
-
10
-
11
-
12
-
13
-
14
-
15
-
 16
16 -
 17
17 -
 18
18 -
 19
19 -
 20
20 -
 21
21 -
 22
22 -
 23
23 -
 24
24 -
 25
25 -
 26
26 -
27
-
28
-
29
-
30
-
31
-
32
-
33
-
34
-
35
-
36
-
37
-
38
-
39
-
40
-
41
-
42
-
43
-
44
-
45
-
46
-
47
-
48
-
49
-
50
-
51
-
52
-
53
-
54
-
55
-
56
-
57
-
58
-
59
-
60
-
61
-
62
-
63
-
64
-
65
-
66
-
67
-
68
 |
 |