HP Photosmart R607 HP Photosmart R507/R607 digital camera with HP Instant Shar - Page 59
ISO Speed, Manual White Balance, Shutter, White Balance, Live View, Manual, Menu/OK, Manual White
 |
View all HP Photosmart R607 manuals
Add to My Manuals
Save this manual to your list of manuals |
Page 59 highlights
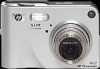
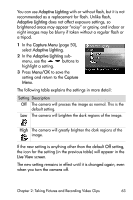
To change the Manual White Balance setting: 1 Point the camera at a white or gray target (such as a piece of paper), making sure that the entire screen encompasses the white or gray target. 2 Press the Shutter button (the camera will not take a picture). The camera then calculates a custom White Balance setting based on the region inside the focus brackets. During the calculation, PROCESSING... is displayed on the screen. When the calculation is complete, the color tint in Live View changes to match the new Manual White Balance setting, and WHITE BALANCE SET is displayed. 3 If needed, repeat steps 1 and 2 until you get the desired Manual White Balance setting. 4 When you are satisfied with the Manual setting you have made, press the Menu/OK button to exit the Manual White Balance screen and return to the Capture Menu. ISO Speed NOTE This setting does not apply when recording video clips. This setting adjusts the sensitivity of the camera to light. When ISO Speed is set to the default Auto setting, the camera selects the best ISO speed for the scene. Lower ISO speeds will capture the best quality images with the least amount of grain (or noise), but result in slower shutter speeds. If taking a picture in low light conditions without a flash at ISO 100, you may want to use a tripod. In contrast, higher ISO numbers allow faster shutter speeds, and can be used when taking pictures in dark areas without a flash, or pictures of fast moving objects. Higher ISO speeds produce pictures with more grain (or noise) and, thus, can be of lower quality. Chapter 2: Taking Pictures and Recording Video Clips 59
-
 1
1 -
2
-
3
-
4
-
5
-
6
-
7
-
8
-
9
-
10
-
11
-
12
-
13
-
14
-
15
-
16
-
17
-
18
-
19
-
20
-
21
-
22
-
23
-
24
-
25
-
26
-
27
-
28
-
29
-
30
-
31
-
32
-
33
-
34
-
35
-
36
-
37
-
38
-
39
-
40
-
41
-
42
-
43
-
44
-
45
-
46
-
47
-
48
-
49
-
50
-
51
-
52
-
53
-
 54
54 -
 55
55 -
 56
56 -
 57
57 -
 58
58 -
 59
59 -
 60
60 -
 61
61 -
 62
62 -
 63
63 -
 64
64 -
65
-
66
-
67
-
68
-
69
-
70
-
71
-
72
-
73
-
74
-
75
-
76
-
77
-
78
-
79
-
80
-
81
-
82
-
83
-
84
-
85
-
86
-
87
-
88
-
89
-
90
-
91
-
92
-
93
-
94
-
95
-
96
-
97
-
98
-
99
-
100
-
101
-
102
-
103
-
104
-
105
-
106
-
107
-
108
-
109
-
110
-
111
-
112
-
113
-
114
-
115
-
116
-
117
-
118
-
119
-
120
-
121
-
122
-
123
-
124
-
125
-
126
-
127
-
128
-
129
-
130
-
131
-
132
-
133
-
134
-
135
-
136
-
137
-
138
-
139
-
140
-
141
-
142
-
143
-
144
-
145
-
146
-
147
-
148
-
149
-
150
-
151
-
152
-
153
-
154
-
155
-
156
-
157
-
158
-
159
-
160
-
161
-
162
-
163
-
164
-
165
-
166
-
167
-
168
-
169
-
170
-
171
-
172
-
173
-
174
-
175
-
176
-
177
-
178
-
179
 |
 |
