HP Photosmart R607 HP Photosmart R507/R607 digital camera with HP Instant Shar - Page 67
Date & Time Imprint, Sharpness, Medium, Menu/OK, Panorama, Date & Time, Rotate, Playback Menu
 |
View all HP Photosmart R607 manuals
Add to My Manuals
Save this manual to your list of manuals |
Page 67 highlights
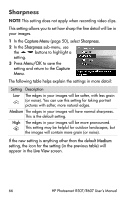
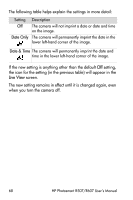
The new setting remains in effect until it is changed again or until the camera is turned off. The Sharpness setting resets to the default Medium setting when you turn the camera off. Holding down the Menu/OK button when you turn the camera back on will restore this setting to what it was when you turned it off. Date & Time Imprint NOTE This setting does not apply in Panorama mode or when recording video clips. This setting imprints either the date or the date and time of when the image was captured in the lower left-hand corner of the image. Once you select either of the Date & Time Imprint settings, the date or date and time will be imprinted on all subsequent still images that are captured, not to previously captured images. NOTE Once you have taken a picture using either the Date Only or Date & Time setting, the date or date and time that is imprinted on the image cannot be removed later. NOTE If you rotate the image using the Rotate option in the Playback Menu (page 75), the date or date and time imprint will likewise rotate with the image. 1 In the Capture Menu (page 50), select Date & Time Imprint. 2 In the Date & Time Imprint sub- menu, use the buttons to highlight a setting. 3 Press Menu/OK to save the setting and return to the Capture Menu. Chapter 2: Taking Pictures and Recording Video Clips 67
-
 1
1 -
2
-
3
-
4
-
5
-
6
-
7
-
8
-
9
-
10
-
11
-
12
-
13
-
14
-
15
-
16
-
17
-
18
-
19
-
20
-
21
-
22
-
23
-
24
-
25
-
26
-
27
-
28
-
29
-
30
-
31
-
32
-
33
-
34
-
35
-
36
-
37
-
38
-
39
-
40
-
41
-
42
-
43
-
44
-
45
-
46
-
47
-
48
-
49
-
50
-
51
-
52
-
53
-
54
-
55
-
56
-
57
-
58
-
59
-
60
-
61
-
 62
62 -
 63
63 -
 64
64 -
 65
65 -
 66
66 -
 67
67 -
 68
68 -
 69
69 -
 70
70 -
 71
71 -
 72
72 -
73
-
74
-
75
-
76
-
77
-
78
-
79
-
80
-
81
-
82
-
83
-
84
-
85
-
86
-
87
-
88
-
89
-
90
-
91
-
92
-
93
-
94
-
95
-
96
-
97
-
98
-
99
-
100
-
101
-
102
-
103
-
104
-
105
-
106
-
107
-
108
-
109
-
110
-
111
-
112
-
113
-
114
-
115
-
116
-
117
-
118
-
119
-
120
-
121
-
122
-
123
-
124
-
125
-
126
-
127
-
128
-
129
-
130
-
131
-
132
-
133
-
134
-
135
-
136
-
137
-
138
-
139
-
140
-
141
-
142
-
143
-
144
-
145
-
146
-
147
-
148
-
149
-
150
-
151
-
152
-
153
-
154
-
155
-
156
-
157
-
158
-
159
-
160
-
161
-
162
-
163
-
164
-
165
-
166
-
167
-
168
-
169
-
170
-
171
-
172
-
173
-
174
-
175
-
176
-
177
-
178
-
179
 |
 |
