HP Photosmart R607 HP Photosmart R507/R607 digital camera with HP Instant Shar - Page 65
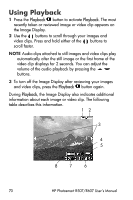
Saturation, Capture Menu, Menu/OK, Capture, Medium, Live View
 |
View all HP Photosmart R607 manuals
Add to My Manuals
Save this manual to your list of manuals |
Page 65 highlights
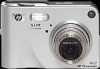
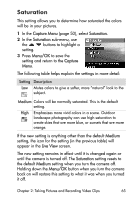
Saturation This setting allows you to determine how saturated the colors will be in your pictures. 1 In the Capture Menu (page 50), select Saturation. 2 In the Saturation sub-menu, use the buttons to highlight a setting. 3 Press Menu/OK to save the setting and return to the Capture Menu. The following table helps explain the settings in more detail: Setting Description Low Mutes colors to give a softer, more "natural" look to the - subject. Medium Colors will be normally saturated. This is the default setting. High + Emphasizes more vivid colors in a scene. Outdoor landscape photography can use high saturation to create skies that are more blue, or sunsets that are more orange. If the new setting is anything other than the default Medium setting, the icon for the setting (in the previous table) will appear in the Live View screen. The new setting remains in effect until it is changed again or until the camera is turned off. The Saturation setting resets to the default Medium setting when you turn the camera off. Holding down the Menu/OK button when you turn the camera back on will restore this setting to what it was when you turned it off. Chapter 2: Taking Pictures and Recording Video Clips 65
-
 1
1 -
2
-
3
-
4
-
5
-
6
-
7
-
8
-
9
-
10
-
11
-
12
-
13
-
14
-
15
-
16
-
17
-
18
-
19
-
20
-
21
-
22
-
23
-
24
-
25
-
26
-
27
-
28
-
29
-
30
-
31
-
32
-
33
-
34
-
35
-
36
-
37
-
38
-
39
-
40
-
41
-
42
-
43
-
44
-
45
-
46
-
47
-
48
-
49
-
50
-
51
-
52
-
53
-
54
-
55
-
56
-
57
-
58
-
59
-
 60
60 -
 61
61 -
 62
62 -
 63
63 -
 64
64 -
 65
65 -
 66
66 -
 67
67 -
 68
68 -
 69
69 -
 70
70 -
71
-
72
-
73
-
74
-
75
-
76
-
77
-
78
-
79
-
80
-
81
-
82
-
83
-
84
-
85
-
86
-
87
-
88
-
89
-
90
-
91
-
92
-
93
-
94
-
95
-
96
-
97
-
98
-
99
-
100
-
101
-
102
-
103
-
104
-
105
-
106
-
107
-
108
-
109
-
110
-
111
-
112
-
113
-
114
-
115
-
116
-
117
-
118
-
119
-
120
-
121
-
122
-
123
-
124
-
125
-
126
-
127
-
128
-
129
-
130
-
131
-
132
-
133
-
134
-
135
-
136
-
137
-
138
-
139
-
140
-
141
-
142
-
143
-
144
-
145
-
146
-
147
-
148
-
149
-
150
-
151
-
152
-
153
-
154
-
155
-
156
-
157
-
158
-
159
-
160
-
161
-
162
-
163
-
164
-
165
-
166
-
167
-
168
-
169
-
170
-
171
-
172
-
173
-
174
-
175
-
176
-
177
-
178
-
179
 |
 |