HP ProBook 4446s HP ProBook 4445s Notebook PC HP ProBook 4446s Notebook PC - M - Page 91
BIOS Setup Menu, Main menu, Security menu, Diagnostics menu
 |
View all HP ProBook 4446s manuals
Add to My Manuals
Save this manual to your list of manuals |
Page 91 highlights
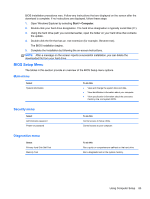
BIOS installation procedures vary. Follow any instructions that are displayed on the screen after the download is complete. If no instructions are displayed, follow these steps: 1. Open Windows Explorer by selecting Start > Computer. 2. Double-click your hard drive designation. The hard drive designation is typically Local Disk (C:). 3. Using the hard drive path you recorded earlier, open the folder on your hard drive that contains the update. 4. Double-click the file that has an .exe extension (for example, filename.exe). The BIOS installation begins. 5. Complete the installation by following the on-screen instructions. NOTE: After a message on the screen reports a successful installation, you can delete the downloaded file from your hard drive. BIOS Setup Menu The tables in this section provide an overview of the BIOS Setup menu options. Main menu Select System information To do this ● View and change the system time and date. ● View identification information about your computer. ● View specification information about the processor, memory size, and system BIOS. Security menu Select Administrator password Power-on password To do this Control access to Setup Utility. Control access to your computer. Diagnostics menu Select Primary Hard Disk Self Test Memory Test To do this Run a quick or comprehensive self-test on the hard drive. Run a diagnostic test on the system memory. Using Computer Setup 83
-
 1
1 -
2
-
3
-
4
-
5
-
6
-
7
-
8
-
9
-
10
-
11
-
12
-
13
-
14
-
15
-
16
-
17
-
18
-
19
-
20
-
21
-
22
-
23
-
24
-
25
-
26
-
27
-
28
-
29
-
30
-
31
-
32
-
33
-
34
-
35
-
36
-
37
-
38
-
39
-
40
-
41
-
42
-
43
-
44
-
45
-
46
-
47
-
48
-
49
-
50
-
51
-
52
-
53
-
54
-
55
-
56
-
57
-
58
-
59
-
60
-
61
-
62
-
63
-
64
-
65
-
66
-
67
-
68
-
69
-
70
-
71
-
72
-
73
-
74
-
75
-
76
-
77
-
78
-
79
-
80
-
81
-
82
-
83
-
84
-
85
-
 86
86 -
 87
87 -
 88
88 -
 89
89 -
 90
90 -
 91
91 -
 92
92 -
 93
93 -
 94
94 -
 95
95 -
 96
96 -
97
-
98
-
99
-
100
-
101
-
102
-
103
-
104
-
105
-
106
-
107
-
108
-
109
-
110
-
111
-
112
-
113
-
114
 |
 |