HP ProLiant DL160se HP ProLiant DL160se G6 Server Maintenance and Service Guid - Page 93
Removal and replacement procedures, Reinstalling the Non-hot-plug Power Supply
 |
View all HP ProLiant DL160se manuals
Add to My Manuals
Save this manual to your list of manuals |
Page 93 highlights
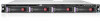
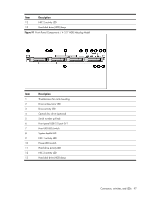
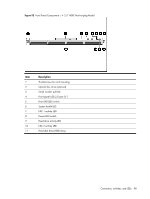
Figure 85 Reinstalling the Non-hot-plug Power Supply 3. Fasten the two screws which are located beneath the chassis to secure the power supply. Figure 86 Fastening the Two Screws beneath the Chassis Removal and replacement procedures 93
-
 1
1 -
2
-
3
-
4
-
5
-
6
-
7
-
8
-
9
-
10
-
11
-
12
-
13
-
14
-
15
-
16
-
17
-
18
-
19
-
20
-
21
-
22
-
23
-
24
-
25
-
26
-
27
-
28
-
29
-
30
-
31
-
32
-
33
-
34
-
35
-
36
-
37
-
38
-
39
-
40
-
41
-
42
-
43
-
44
-
45
-
46
-
47
-
48
-
49
-
50
-
51
-
52
-
53
-
54
-
55
-
56
-
57
-
58
-
59
-
60
-
61
-
62
-
63
-
64
-
65
-
66
-
67
-
68
-
69
-
70
-
71
-
72
-
73
-
74
-
75
-
76
-
77
-
78
-
79
-
80
-
81
-
82
-
83
-
84
-
85
-
86
-
87
-
 88
88 -
 89
89 -
 90
90 -
 91
91 -
 92
92 -
 93
93 -
 94
94 -
 95
95 -
 96
96 -
 97
97 -
 98
98 -
99
-
100
-
101
-
102
-
103
-
104
-
105
-
106
-
107
-
108
-
109
-
110
-
111
-
112
-
113
-
114
-
115
-
116
-
117
-
118
-
119
-
120
-
121
-
122
-
123
-
124
-
125
-
126
-
127
-
128
 |
 |

Removal and replacement procedures
93
Figure 85
Reinstalling the Non-hot-plug Power Supply
3.
Fasten the two screws which are located beneath the chassis to secure the power supply.
Figure 86
Fastening the Two Screws beneath the Chassis