HP Q1581A HP StorageWorks DAT SAS Tape Drives User Guide (DW092-90905, Novembe - Page 24
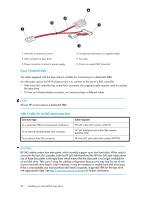
Attach mounting hardware, system
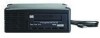 |
UPC - 882780612716
View all HP Q1581A manuals
Add to My Manuals
Save this manual to your list of manuals |
Page 24 highlights
CAUTION: Static electricity can damage electronic components. Always wear an antistatic wriststrap if one is available. If not, after you have disconnected power from the server and removed the cover, touch a bare metal part of the chassis. Similarly, touch a bare metal part of the drive before installing it. 1. Refer to your server documentation for detailed instructions and assemble the necessary tools and materials. 2. Perform a normal system shutdown and turn off the server and any connected peripherals. 3. Remove the cover and access panel from the server, as detailed in your server's documentation. As you work inside the server, you may have to disconnect other signal cables or power cables from other devices to maneuver the new drive into place. If you have to do this, make a note of their position and connections so you can put them back correctly later. 4. Remove the filler panel from a spare 5¼-inch bay of your server, as described in your server's documentation. With some servers you may also need to remove the half-height device divider. Keep any screws for use in "Secure the drive" on page 36. 5. You are now ready to install your tape drive. Attach mounting hardware If your server requires special rails or other hardware to install the tape drive, mount them on the tape drive now. If your server does not require special mounting hardware, proceed to "Install drive" on page 25 now. Please check your HP ProLiant server documentation to ascertain the correct method of mounting, and to check whether mounting hardware is provided with the server or must be purchased separately. For more details about mounting hardware refer also to: http://www.hp.com/go/connect. NOTE: Some servers use non-standard mounting rails and do not include spares. If this is the case with your system, you will have to order these accessories from the server manufacturer before you can install the tape drive. Different models of server require different mounting methods. Always refer to your server documentation for details. The following diagrams illustrate common mounting methods. NOTE: If mounting hardware is supplied with your tape drive, it may not be exactly the same as shown in the illustrations. 24 Installing an internal DAT tape drive
-
 1
1 -
2
-
3
-
4
-
5
-
6
-
7
-
8
-
9
-
10
-
11
-
12
-
13
-
14
-
15
-
16
-
17
-
18
-
 19
19 -
 20
20 -
 21
21 -
 22
22 -
 23
23 -
 24
24 -
 25
25 -
 26
26 -
 27
27 -
 28
28 -
 29
29 -
30
-
31
-
32
-
33
-
34
-
35
-
36
-
37
-
38
-
39
-
40
-
41
-
42
-
43
-
44
-
45
-
46
-
47
-
48
-
49
-
50
-
51
-
52
-
53
-
54
-
55
-
56
-
57
-
58
-
59
-
60
-
61
-
62
-
63
-
64
-
65
-
66
-
67
-
68
-
69
-
70
-
71
-
72
-
73
-
74
-
75
-
76
-
77
-
78
-
79
-
80
-
81
-
82
-
83
-
84
-
85
-
86
-
87
-
88
 |
 |
