HP Q1581A HP StorageWorks DAT SAS Tape Drives User Guide (DW092-90905, Novembe - Page 60
Front panel, DAT 160 tape drives, LED sequences, DAT 320 and DAT 160 tape drives
 |
UPC - 882780612716
View all HP Q1581A manuals
Add to My Manuals
Save this manual to your list of manuals |
Page 60 highlights
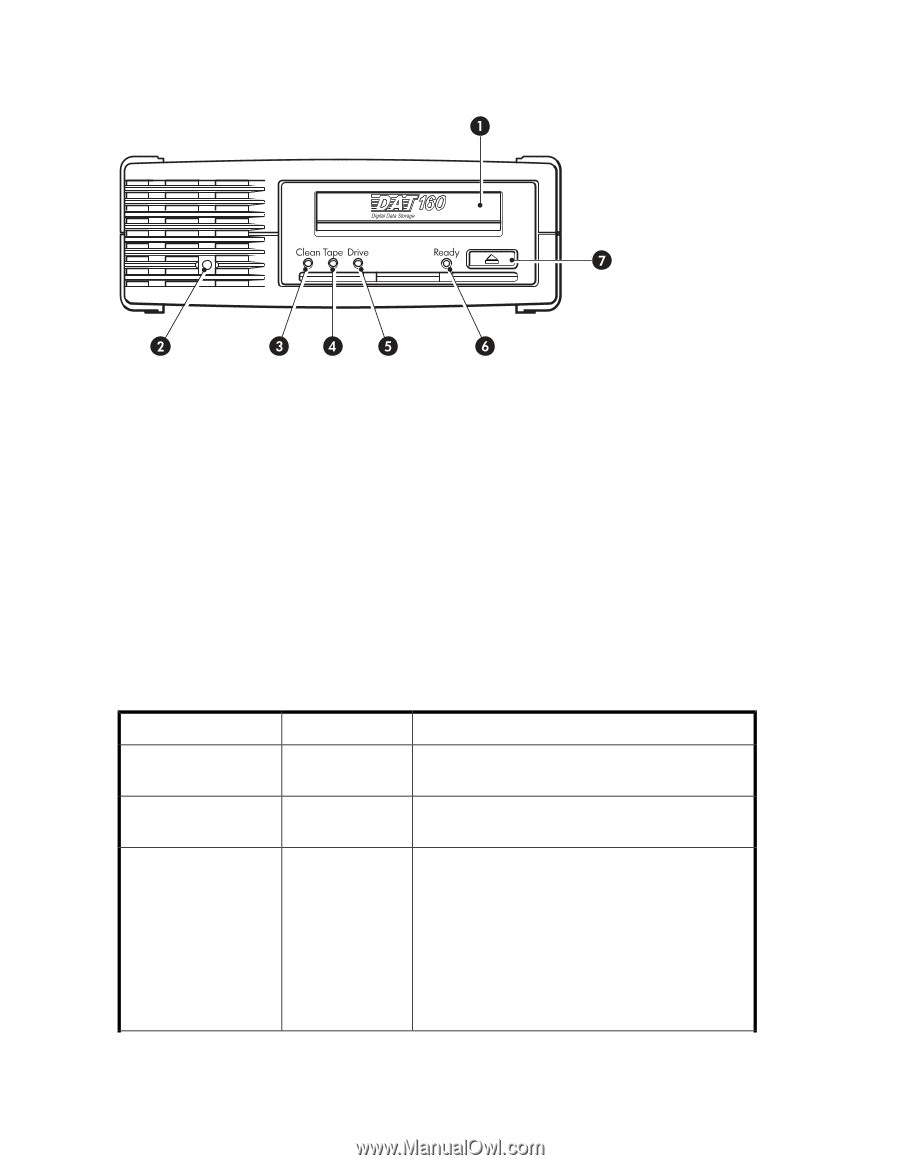
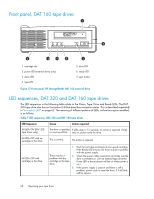
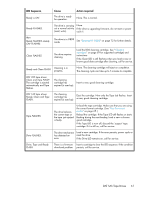
Front panel, DAT 160 tape drives 1. cartridge slot 2. power LED (external drives only) 3. clean LED 4. tape LED 5. drive LED 6. ready LED 7. eject button Figure 37 Front panel, HP StorageWorks DAT 160 external drive . LED sequences, DAT 320 and DAT 160 tape drives The LED sequences in the following table relate to the Clean, Tape, Drive and Ready LEDs. The DAT 320 tape drive also has an Encryption LED that describes encryption status. This is described separately in "Encryption LED" on page 62. The meaning of different patterns of LEDs, without encryption enabled, is as follows: Table 7 LED sequences, DAT 320 and DAT 160 tape drives LED Sequence All LEDs ON (DAT 320 tape drives only) Cause Action required The drive is resetting If LEDs clear in 15 seconds, no action is required. If they or running self-test. stay on, power cycle the drive. All LEDs OFF with no cartridge in the drive. This is normal. No action is required. All LEDs OFF with cartridge in the drive. 1. Eject the cartridge and load a known-good cartridge. If the Ready LED remains off, there may be a problem with the power supply. There may be a 2. Check the power cable connection and make sure the problem with the drive is switched on. (On an external tape drive the cartridge or the tape Power LED in the enclosure will be on when power is drive. on.) 3. If the power supply is present and there is still a problem, power cycle or reset the drive. If it still fails, call for service. 60 Operating your tape drive
-
 1
1 -
2
-
3
-
4
-
5
-
6
-
7
-
8
-
9
-
10
-
11
-
12
-
13
-
14
-
15
-
16
-
17
-
18
-
19
-
20
-
21
-
22
-
23
-
24
-
25
-
26
-
27
-
28
-
29
-
30
-
31
-
32
-
33
-
34
-
35
-
36
-
37
-
38
-
39
-
40
-
41
-
42
-
43
-
44
-
45
-
46
-
47
-
48
-
49
-
50
-
51
-
52
-
53
-
54
-
 55
55 -
 56
56 -
 57
57 -
 58
58 -
 59
59 -
 60
60 -
 61
61 -
 62
62 -
 63
63 -
 64
64 -
 65
65 -
66
-
67
-
68
-
69
-
70
-
71
-
72
-
73
-
74
-
75
-
76
-
77
-
78
-
79
-
80
-
81
-
82
-
83
-
84
-
85
-
86
-
87
-
88
 |
 |