HP Q1581A HP StorageWorks DAT SAS Tape Drives User Guide (DW092-90905, Novembe - Page 53
Securing the blanking plate
 |
UPC - 882780612716
View all HP Q1581A manuals
Add to My Manuals
Save this manual to your list of manuals |
Page 53 highlights
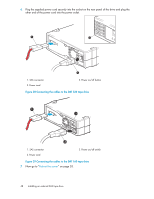
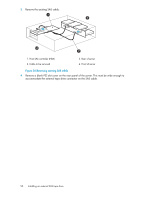
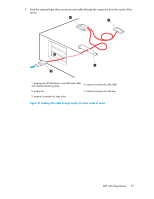
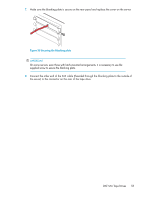
7. Make sure the blanking plate is secure on the rear panel and replace the cover on the server. Figure 33 Securing the blanking plate . IMPORTANT: On some servers, even those with latch-mounted arrangements, it is necessary to use the supplied screw to secure the blanking plate. 8. Connect the other end of the SAS cable (threaded through the blanking plate to the outside of the server) to the connector on the rear of the tape drive. DAT SAS Tape Drives 53
-
 1
1 -
2
-
3
-
4
-
5
-
6
-
7
-
8
-
9
-
10
-
11
-
12
-
13
-
14
-
15
-
16
-
17
-
18
-
19
-
20
-
21
-
22
-
23
-
24
-
25
-
26
-
27
-
28
-
29
-
30
-
31
-
32
-
33
-
34
-
35
-
36
-
37
-
38
-
39
-
40
-
41
-
42
-
43
-
44
-
45
-
46
-
47
-
 48
48 -
 49
49 -
 50
50 -
 51
51 -
 52
52 -
 53
53 -
 54
54 -
 55
55 -
 56
56 -
 57
57 -
 58
58 -
59
-
60
-
61
-
62
-
63
-
64
-
65
-
66
-
67
-
68
-
69
-
70
-
71
-
72
-
73
-
74
-
75
-
76
-
77
-
78
-
79
-
80
-
81
-
82
-
83
-
84
-
85
-
86
-
87
-
88
 |
 |

7.
Make sure the blanking plate is secure on the rear panel and replace the cover on the server.
Figure 33 Securing the blanking plate
.
IMPORTANT:
On some servers, even those with latch-mounted arrangements, it is necessary to use the
supplied screw to secure the blanking plate.
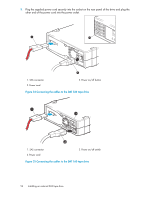
8.
Connect the other end of the SAS cable (threaded through the blanking plate to the outside of
the server) to the connector on the rear of the tape drive.
DAT SAS Tape Drives
53