HP Q1581A HP StorageWorks DAT SAS Tape Drives User Guide (DW092-90905, Novembe - Page 57
Verify installation
 |
UPC - 882780612716
View all HP Q1581A manuals
Add to My Manuals
Save this manual to your list of manuals |
Page 57 highlights
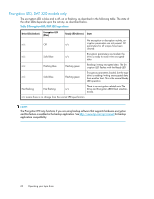
5 Verify installation Once you have installed the drive hardware, check that drivers have been installed correctly and you have the correct version of backup software, and verify that the tape drive is functioning properly before you store your valuable data. NOTE: Certain backup applications require you to use their own Tape driver instead of the HP Tape driver. 1. Switch on the drive and the server. 2. The tape drive will run its hardware self-test, which takes about 5 seconds. During self-test all the LEDs turn on and turn off again at completion. If self-test passes and there is a cartridge in the drive, the green Ready LED then shows steady green. (If there is no cartridge, the Ready LED is off.) If the test fails, the Drive Error and Tape Error LEDs flash, while the Ready and Clean LEDs are off. This continues until the drive is reset. See "Operating your tape drive" on page 59 for more information about front panel lights. 3. Verify that the tape drive installation was successful. For many operating systems you can run HP Library & Tape Tools from the HP StorageWorks CD-ROM. See also "Diagnostic Tools and Performance" on page 75 for more information about HP Library & Tape Tools, HP's free diagnostics and troubleshooting software. If you encounter a problem during this verification procedure, turn to "Troubleshooting" on page 79 for help in diagnosing and fixing the problem. 4. You are now ready to carry out a backup and restore test to check that the drive can write data to tape. Use a blank cartridge. Windows Backup or native backup applications can be used to check basic tape drive operation, but they will not support all the advanced features of your tape drive. We recommend that you upgrade your software application before running this test. Check http://www.hp.com/go/connect for software compatibility and install any recommended upgrades. DAT SAS Tape Drives 57
-
 1
1 -
2
-
3
-
4
-
5
-
6
-
7
-
8
-
9
-
10
-
11
-
12
-
13
-
14
-
15
-
16
-
17
-
18
-
19
-
20
-
21
-
22
-
23
-
24
-
25
-
26
-
27
-
28
-
29
-
30
-
31
-
32
-
33
-
34
-
35
-
36
-
37
-
38
-
39
-
40
-
41
-
42
-
43
-
44
-
45
-
46
-
47
-
48
-
49
-
50
-
51
-
 52
52 -
 53
53 -
 54
54 -
 55
55 -
 56
56 -
 57
57 -
 58
58 -
 59
59 -
 60
60 -
 61
61 -
 62
62 -
63
-
64
-
65
-
66
-
67
-
68
-
69
-
70
-
71
-
72
-
73
-
74
-
75
-
76
-
77
-
78
-
79
-
80
-
81
-
82
-
83
-
84
-
85
-
86
-
87
-
88
 |
 |
