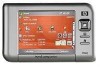
HP Rx5910 HP iPAQ rx5700/rx5900 Travel Companion Product Information Guide - Page 40
E-mail, Different Ways to Access E-mail Messages, Setting up an E-mail Account on an Exchange Server
 |
UPC - 882780587625
View all HP Rx5910 manuals
Add to My Manuals
Save this manual to your list of manuals |
Page 40 highlights
E-mail Different Ways to Access E-mail Messages When using Messaging, you can send and receive e-mail messages several ways: ● Synchronize Outlook e-mail with your personal computer Tap Start > Messaging to use your Outlook e-mail address. ● Microsoft Exchange 2003 Exchange enables you to wirelessly synchronize your Inbox, Calendar, and Contacts to remotely check appointments and other information. For more information about Exchange, contact your IT administrator. ● Messaging & Security Feature Pack (MSFP) with Microsoft Exchange 2003 Service Pack 2 Push technology keeps Outlook Mobile up-to-date by delivering Inbox, Calendar, Contacts, and Tasks list quickly and directly to your HP iPAQ. For more information about Connect to Mobile Business E-mail using Exchange Server 2003, contact your IT administrator. ● Internet e-mail messages Use the e-mail address you received from your Internet Service Provider (ISP) or your employer. NOTE Some of the messaging applications may vary and are available only on select HP iPAQ models. Setting up an E-mail Account on an Exchange Server Synchronize directly with an Exchange Server using a connection to a wireless network or a personal computer. To set up e-mail on an Exchange server: 1. Tap Start > Programs > ActiveSync. NOTE If a screen displays several messages, click on the link that reads If your company supports synchronizing directly with its Exchange Server you can set up your HP iPAQ to synchronize with it, then follow the series of steps to synchronize your e-mail account with the Exchange Server. Otherwise, continue with the steps below. 2. Tap Menu > Configure Server. If you have not set up a synchronization server link, the following message is displayed: Add Server Source. 3. In the Server address box, enter the name of the server running Exchange 2003. 4. Select the This server requires an encrypted (SSL) connection check box if required by your IT department. Most companies require this option, and if this box is not checked, you cannot sync with your company Exchange Server. 5. Tap Next. 34
-
 1
1 -
2
-
3
-
4
-
5
-
6
-
7
-
8
-
9
-
10
-
11
-
12
-
13
-
14
-
15
-
16
-
17
-
18
-
19
-
20
-
21
-
22
-
23
-
24
-
25
-
26
-
27
-
28
-
29
-
30
-
31
-
32
-
33
-
34
-
 35
35 -
 36
36 -
 37
37 -
 38
38 -
 39
39 -
 40
40 -
 41
41 -
 42
42 -
 43
43 -
 44
44 -
 45
45 -
46
-
47
-
48
-
49
-
50
 |
 |
