HP Scanjet 4670 hp scanjet 4600 series digital flatbed scanners user manual - Page 13
scan pictures and documents, print copies, HP Director. For more information - software
 |
View all HP Scanjet 4670 manuals
Add to My Manuals
Save this manual to your list of manuals |
Page 13 highlights
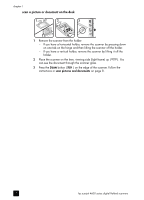
how to use the scanner scan pictures and documents Use the SCAN button ( ) to scan pictures and documents. Note: Macintosh users, see the HP Photo & Imaging software Help for information about scanning procedures. 1 Position the item on the scanner. For more information, see position the item to scan on page 4. 2 Press the SCAN button ( ). 3 In the dialog box that appears, select: - Picture if you are scanning a printed photograph, graphic, slide, or negative. - Document if you are scanning text, both text and graphics, or any text that you want to edit later. (For more information on scanning text to edit, see scanning text for editing on page 11.) 4 Select a destination (where you want the software to send the image). 5 Click Scan in the dialog box. The item is scanned. 6 A dialog box appears, asking if you want to scan another image. - If you have more items to scan, place another item and either click SCAN in the dialog box or press the SCAN button ( ) on the scanner. - If you have finished scanning your items, click Done. The items appear in the destination specified in Step 4. Note: By default, the software does not prompt you to preview the picture or document when you use the SCAN button on the scanner. If you want to preview the item, either change the button setting in the HP Director, or initiate the scan from the HP Director instead of the SCAN button on the scanner. print copies Use the COPY button ( ) to scan an item and send it directly to a printer to make copies. Note: Macintosh users, see the HP Photo & Imaging software Help for information about copying procedures. 1 Position the item on the scanner. For more information, see position the item to scan on page 4. 2 Press the COPY button ( ) on the scanner. The copies are printed on the default printer. A progress dialog box appears that shows the copy progress. Note: To change any copy settings, such as size, darkness, or the printer, click Cancel in the Copy in Progress dialog box. The HP Copying dialog box appears, where you can change settings. You can also make copies by accessing the HP Copying software from the HP Director. For more information, see the HP Photo & Imaging software Help. user's manual 8
-
 1
1 -
2
-
3
-
4
-
5
-
6
-
7
-
 8
8 -
 9
9 -
 10
10 -
 11
11 -
 12
12 -
 13
13 -
 14
14 -
 15
15 -
 16
16 -
 17
17 -
 18
18 -
19
-
20
-
21
-
22
-
23
-
24
-
25
-
26
-
27
-
28
-
29
-
30
-
31
-
32
-
33
-
34
-
35
-
36
-
37
-
38
 |
 |