HP Scanjet 4670 hp scanjet 4600 series digital flatbed scanners user manual - Page 15
scan oversized items, Panorama Maker. - instruction manual
 |
View all HP Scanjet 4670 manuals
Add to My Manuals
Save this manual to your list of manuals |
Page 15 highlights
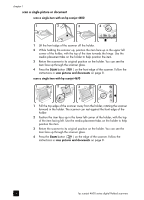
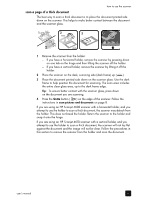
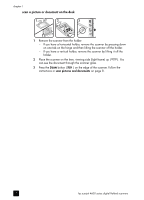
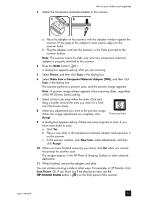
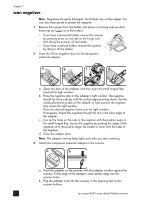
how to use the scanner scan oversized items If you have an item to scan that is larger than the scanning glass you can scan it in multiple sections, and then connect the sections with Panorama Maker software. Use the Panorama Maker software to connect multiple scans. Use the ReadIris Pro software if you want to convert a document into editable text. If you did not install this software when you set up the scanner, insert the scanner CD to install it now. See the Setup Poster for installation information. Note: Macintosh users, see the HP Photo & Imaging software Help for information about scanning procedures. 1 Remove the scanner from the holder: - If you have a horizontal holder, remove the scanner by pressing down on one tab on the hinge and then lifting the scanner off the holder. - If you have a vertical holder, remove the scanner by lifting it off the holder. 2 Place the scanner with the viewing side (light frame) up ( ) on the item to scan. Place the scanner so you can see the upper left portion of the item through the scanner, using the frame around the scanner glass to position the item. 3 Press the SCAN button ( ) on the scanner. 4 In the dialog box that appears, select: - Picture if you are scanning a photograph or other artwork. - Document if you are scanning text or both text and graphics. You must select No when asked Scan for Editable Text (OCR)? 5 Select Panorama Maker as the destination. 6 Click Scan in the dialog box. The item is scanned. Note: If you see a preview dialog now, this procedure will not work as documented. See turn preview image on or off on page 11 to turn preview off. 7 Align the scanner on the next section of the item. Overlap the sections by at least 1.3 mm (1/2 inch). Press the SCAN button ( ) on the scanner. Continue to scan each section of the item until you are done. 8 When you have finished scanning the sections, click Done in the dialog box on the computer screen. 9 Panorama Maker automatically starts. All the scanned sections are sent to Panorama Maker. 10 In the Panorama Maker software, arrange the images in the correct order and follow the on-screen instructions. See the Panorama Maker Help for instructions. 11 If you scanned a text document and want to use optical character recognition (OCR) to make the scanned document editable, then from Panorama Maker, save the combined image as a TIFF file, and then import the TIFF file into the ReadIris Pro software to perform OCR. user's manual 10
-
 1
1 -
2
-
3
-
4
-
5
-
6
-
7
-
8
-
9
-
 10
10 -
 11
11 -
 12
12 -
 13
13 -
 14
14 -
 15
15 -
 16
16 -
 17
17 -
 18
18 -
 19
19 -
 20
20 -
21
-
22
-
23
-
24
-
25
-
26
-
27
-
28
-
29
-
30
-
31
-
32
-
33
-
34
-
35
-
36
-
37
-
38
 |
 |