HP Scanjet 8200c HP Scanjet 8200 series scanners - (English) User Manual - Page 11
scan documents, scan pictures, scan from other applications - manual
 |
View all HP Scanjet 8200c manuals
Add to My Manuals
Save this manual to your list of manuals |
Page 11 highlights
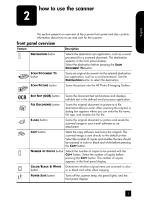
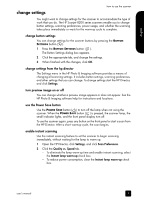
English how to use the scanner scan from other applications You can bring an image directly into an open file in one of your applications if the application is TWAIN compliant. Generally, the application is compliant if it has a command such as Acquire, Scan, or Import New Object. If you are unsure whether the application is compliant or what the command is, see the documentation for the application. scan documents Use the SCAN DOCUMENT TO button ( ) to scan documents. 1 Place the originals face down on the scanner glass or face up in the ADF. If you are scanning two-sided originals from an ADF, slide the DUPLEX switch to two-sided mode ( ). 2 Select a destination by pressing the DESTINATION button ( ) until the desired destination appears in the front panel display. 3 Press the SCAN DOCUMENT TO button ( ). Note: A preview image will not appear when scanning from the ADF. To change this preview setting, see the HP Photo & Imaging software Help. 4 Select the final scan area (the area inside the dotted lines) in the preview image. 5 Make adjustments to the preview image if needed. 6 Click Accept. The final scan area is scanned and appears in the specified destination. scan pictures Use the SCAN PICTURE button ( ) to scan pictures. 1 Place the original face down on the scanner glass and close the lid. Note: You can also use the SCAN PICTURE button to scan slides or negatives from the TMA. For more information, see scan from the TMA on page 15. 2 Press the SCAN PICTURE button ( ). A preview image of the scanned original appears. 3 Select the final scan area (the area inside the dotted lines) in the preview image. 4 Make adjustments to the preview image if needed. 5 Click Accept. The final scan area is scanned and appears in the HP Photo & Imaging Gallery. The scan is saved in the location specified in the Scan Pictures Settings in the HP Photo & Imaging software. user's manual 5
-
 1
1 -
2
-
3
-
4
-
5
-
 6
6 -
 7
7 -
 8
8 -
 9
9 -
 10
10 -
 11
11 -
 12
12 -
 13
13 -
 14
14 -
 15
15 -
 16
16 -
17
-
18
-
19
-
20
-
21
-
22
-
23
-
24
-
25
-
26
-
27
-
28
-
29
-
30
-
31
-
32
-
33
-
34
-
35
-
36
-
37
-
38
-
39
-
40
-
41
-
42
-
43
-
44
-
45
-
46
-
47
-
48
-
49
-
50
-
51
-
52
-
53
-
54
-
55
-
56
-
57
-
58
-
59
-
60
-
61
-
62
-
63
-
64
-
65
-
66
-
67
-
68
-
69
-
70
-
71
-
72
-
73
-
74
-
75
-
76
-
77
-
78
-
79
-
80
-
81
-
82
-
83
-
84
 |
 |
