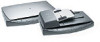
HP Scanjet 8200c HP Scanjet 8200 series scanners - (English) User Manual - Page 12
scan a document so text can be edited, save a document to disk or CD, HP Photo & Imaging software. - scanjet 8200 scanner
 |
View all HP Scanjet 8200c manuals
Add to My Manuals
Save this manual to your list of manuals |
Page 12 highlights
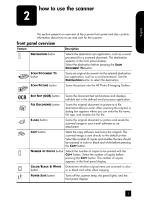
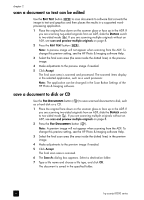
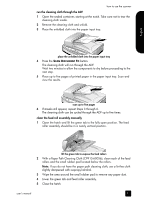
chapter 2 scan a document so text can be edited Use the EDIT TEXT button ( ) to scan documents to software that converts the image to text and graphics and then places the results in a supported wordprocessing application. 1 Place the original face down on the scanner glass or face up in the ADF. If you are scanning two-sided originals from an ADF, slide the DUPLEX switch to two-sided mode ( ). If you are scanning multiple originals without an ADF, see scan and preview multiple originals on page 8. 2 Press the EDIT TEXT button ( ). Note: A preview image will not appear when scanning from the ADF. To change this preview setting, see the HP Photo & Imaging software Help. 3 Select the final scan area (the area inside the dotted lines) in the preview image. 4 Make adjustments to the preview image if needed. 5 Click Accept. The final scan area is scanned and processed. The scanned items display in the selected application, such as a word processor. Note: The application can be changed in the Scan Button Settings of the HP Photo & Imaging software. save a document to disk or CD Use the FILE DOCUMENTS button ( ) to save scanned documents to disk, such as a hard disk or a CD. 1 Place the original face down on the scanner glass or face up in the ADF. If you are scanning two-sided originals from an ADF, slide the DUPLEX switch to two-sided mode ( ). If you are scanning multiple originals without an ADF, see scan and preview multiple originals on page 8. 2 Press the FILE DOCUMENTS button ( ). Note: A preview image will not appear when scanning from the ADF. To change this preview setting, see the HP Photo & Imaging software Help. 3 Select the final scan area (the area inside the dotted lines) in the preview image. 4 Make adjustments to the preview image if needed. 5 Click Accept. The final scan area is scanned. 6 The Save As dialog box appears. Select a destination folder. 7 Type a file name and choose a file type, and click OK. The document is saved in the specified folder. 6 hp scanjet 8200 series
-
 1
1 -
2
-
3
-
4
-
5
-
6
-
 7
7 -
 8
8 -
 9
9 -
 10
10 -
 11
11 -
 12
12 -
 13
13 -
 14
14 -
 15
15 -
 16
16 -
 17
17 -
18
-
19
-
20
-
21
-
22
-
23
-
24
-
25
-
26
-
27
-
28
-
29
-
30
-
31
-
32
-
33
-
34
-
35
-
36
-
37
-
38
-
39
-
40
-
41
-
42
-
43
-
44
-
45
-
46
-
47
-
48
-
49
-
50
-
51
-
52
-
53
-
54
-
55
-
56
-
57
-
58
-
59
-
60
-
61
-
62
-
63
-
64
-
65
-
66
-
67
-
68
-
69
-
70
-
71
-
72
-
73
-
74
-
75
-
76
-
77
-
78
-
79
-
80
-
81
-
82
-
83
-
84
 |
 |