HP Server tc3100 hp server remote management card user guide - Page 116
Installing the Diagnostic Panel in the tc4100 HP, Server
 |
View all HP Server tc3100 manuals
Add to My Manuals
Save this manual to your list of manuals |
Page 116 highlights
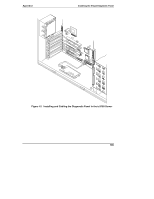
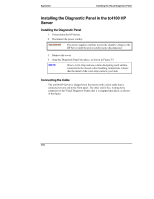
Appendix I Installing the Visual Diagnostic Panel Installing the Diagnostic Panel in the tc4100 HP Server Installing the Diagnostic Panel 1. Power down the HP Server. 2. Disconnect the power cord(s). WARNING The power supplies continue to provide standby voltage to the HP Server until the power cord(s) is/are disconnected. 3. Remove the cover. 4. Snap the Diagnostic Panel into place, as shown in Figure I-3. NOTE Wear a wrist strap and use a static-dissipating work surface connected to the chassis when handling components. Ensure that the metal of the wrist strap contacts your skin. Connecting the Cable The tc4100 HP Server is shipped from the factory with a short cable that is connected on one end to the front panel. The other end is free, waiting to be connected to the Visual Diagnostic Panel after it is snapped into place, as shown in the figure. 110
-
 1
1 -
2
-
3
-
4
-
5
-
6
-
7
-
8
-
9
-
10
-
11
-
12
-
13
-
14
-
15
-
16
-
17
-
18
-
19
-
20
-
21
-
22
-
23
-
24
-
25
-
26
-
27
-
28
-
29
-
30
-
31
-
32
-
33
-
34
-
35
-
36
-
37
-
38
-
39
-
40
-
41
-
42
-
43
-
44
-
45
-
46
-
47
-
48
-
49
-
50
-
51
-
52
-
53
-
54
-
55
-
56
-
57
-
58
-
59
-
60
-
61
-
62
-
63
-
64
-
65
-
66
-
67
-
68
-
69
-
70
-
71
-
72
-
73
-
74
-
75
-
76
-
77
-
78
-
79
-
80
-
81
-
82
-
83
-
84
-
85
-
86
-
87
-
88
-
89
-
90
-
91
-
92
-
93
-
94
-
95
-
96
-
97
-
98
-
99
-
100
-
101
-
102
-
103
-
104
-
105
-
106
-
107
-
108
-
109
-
110
-
 111
111 -
 112
112 -
 113
113 -
 114
114 -
 115
115 -
 116
116 -
 117
117 -
 118
118 -
 119
119 -
 120
120 -
 121
121
 |
 |
