HP Server tc3100 hp server remote management card user guide - Page 31
Setting Up a LAN Connection
 |
View all HP Server tc3100 manuals
Add to My Manuals
Save this manual to your list of manuals |
Page 31 highlights
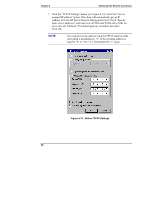
Chapter 4 Setting Up the Remote Connection To use the remote boot feature: 1. Set Remote Boot to "on." Note that once this is set, the Server will continue to attempt to boot off a remote boot image until you go back into the HP Server Remote Management Card BIOS setup program and set this option to "off." 2. Define the filename of the boot image. 3. Enter the IP Address of the TFTP server where the image file is located. 4. When you are finished running the HP Server Remote Management Card's BIOS Setup program, restart the Server and run the Server's BIOS Setup program (typically, accessed by pressing F2 when prompted during the boot-up process). Be sure that the floppy drive is listed as a bootable device and is placed first in the boot order. The HP Server Remote Management Card Settings - Remote Boot Settings Disable Remote Boot Remote Boot DISABLED Set Boot Image Filename BOOTIMG.BIN Set IP-Address of Image TFTP Server 127.0.0.1 Main Menu Figure 4-5. Preparation for Remote Boot NOTE Instructions for setting up a TFTP server may be found in Appendix C, or contact your local network administrator for the correct TFTP server setup and for available boot images. A TFTP server should typically be located within your company's firewall. Setting Up a LAN Connection You can communicate with remote clients by connecting to your local 10/100Base-T compatible network using the RJ-45 jack located at the rear bracket of the HP Server Remote Management Card and an appropriate cable. The following figure illustrates a LAN connection joining an HP Server (with the HP Server Remote Management Card) and a remote client. 25
-
 1
1 -
2
-
3
-
4
-
5
-
6
-
7
-
8
-
9
-
10
-
11
-
12
-
13
-
14
-
15
-
16
-
17
-
18
-
19
-
20
-
21
-
22
-
23
-
24
-
25
-
 26
26 -
 27
27 -
 28
28 -
 29
29 -
 30
30 -
 31
31 -
 32
32 -
 33
33 -
 34
34 -
 35
35 -
 36
36 -
37
-
38
-
39
-
40
-
41
-
42
-
43
-
44
-
45
-
46
-
47
-
48
-
49
-
50
-
51
-
52
-
53
-
54
-
55
-
56
-
57
-
58
-
59
-
60
-
61
-
62
-
63
-
64
-
65
-
66
-
67
-
68
-
69
-
70
-
71
-
72
-
73
-
74
-
75
-
76
-
77
-
78
-
79
-
80
-
81
-
82
-
83
-
84
-
85
-
86
-
87
-
88
-
89
-
90
-
91
-
92
-
93
-
94
-
95
-
96
-
97
-
98
-
99
-
100
-
101
-
102
-
103
-
104
-
105
-
106
-
107
-
108
-
109
-
110
-
111
-
112
-
113
-
114
-
115
-
116
-
117
-
118
-
119
-
120
-
121
 |
 |
