HP StorageWorks 7410 HP StorageWorks Virtual Array va 7000 family - Installati - Page 20
Step 5. Connect the RS-232 terminal, Connecting Enclosure Power Cords
 |
View all HP StorageWorks 7410 manuals
Add to My Manuals
Save this manual to your list of manuals |
Page 20 highlights
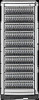
Figure 9 Connecting Enclosure Power Cords Caution If it becomes necessary to completely remove power from the array, you must unplug both power cords from both ac power connectors on the array rear panel. Step 5. Connect the RS-232 terminal 1 Connect one end of the null-modem serial cable to the RS-232 port on either array controller. See Figure 10. Note The RS-232 port on either array controller can communicate with both controllers. 2 Connect the other end of the null-modem serial cable to the RS-232 port on a laptop PC, desktop PC, or any RS-232 terminal. 3 Power-on the PC. 20 Virtual Array Installation Guide
-
 1
1 -
2
-
3
-
4
-
5
-
6
-
7
-
8
-
9
-
10
-
11
-
12
-
13
-
14
-
 15
15 -
 16
16 -
 17
17 -
 18
18 -
 19
19 -
 20
20 -
 21
21 -
 22
22 -
 23
23 -
 24
24 -
 25
25 -
26
-
27
-
28
-
29
-
30
-
31
-
32
-
33
-
34
-
35
-
36
-
37
-
38
-
39
-
40
-
41
-
42
-
43
-
44
-
45
-
46
-
47
-
48
-
49
-
50
-
51
-
52
 |
 |

20
Virtual Array Installation Guide
Figure 9
Connecting Enclosure Power Cords
Caution
If it becomes necessary to completely remove power from the
array, you must unplug both power cords from both ac power
connectors on the array rear panel.
Step 5. Connect the RS-232 terminal
1
Connect one end of the null-modem serial cable to the RS-232 port on
either array controller. See
Figure 10
.
Note
The RS-232 port on either array controller can communicate with
both controllers.
2
Connect the other end of the null-modem serial cable to the RS-232 port on
a laptop PC, desktop PC, or any RS-232 terminal.
3
Power-on the PC.