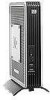
HP T5725 Administrator's Guide: Linux-based HP Compaq t5725 Thin Clients - Page 43
Thin State Deploy, Capture
 |
UPC - 882780693333
View all HP T5725 manuals
Add to My Manuals
Save this manual to your list of manuals |
Page 43 highlights
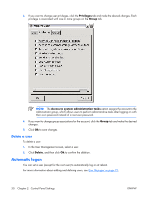
2. Click Next. 3. At this point, attach to the unit a USB drive key. The drive key drive letter and size are displayed. The drive key must be greater in size than the on-board flash disk. As a result, if your thin client has 512-MB Flash, then the USB drive key must be 1 GB. Once the right drive key size is attached, the following screen displays. 4. Click Capture. 5. Click Yes on the warning screen. The ThinState Capture tool formats and makes the USB flash drive bootable. ThinState Capture will now reboot the system. After you perform these actions, the ThinState Capture tool displays the following screen. Please follow the on-screen instructions. You can now use the USB flash drive to deploy the captured image to another HP thin client of the exact same model and hardware. Thin State Deploy To perform a ThinState deployment: 1. Set the boot order in the F10 System Bios to USB boot (if necessary). 2. Attach the USB flash drive to the thin client unit you wish to deploy the captured image to, and then power on the unit. 3. Follow the on-screen instructions. After you remove the USB flash drive and cycle power to the system, the image unbundles. Do not interrupt or cycle power to the unit during this process. You may use the captured image (flash.dd) found in the USB flash drive in combination with Altiris Deployment Solution to remotely image multiple thin client units. ENWW Thin State 35
-
 1
1 -
2
-
3
-
4
-
5
-
6
-
7
-
8
-
9
-
10
-
11
-
12
-
13
-
14
-
15
-
16
-
17
-
18
-
19
-
20
-
21
-
22
-
23
-
24
-
25
-
26
-
27
-
28
-
29
-
30
-
31
-
32
-
33
-
34
-
35
-
36
-
37
-
 38
38 -
 39
39 -
 40
40 -
 41
41 -
 42
42 -
 43
43 -
 44
44 -
 45
45 -
 46
46 -
 47
47 -
 48
48 -
49
-
50
-
51
-
52
-
53
-
54
-
55
-
56
-
57
-
58
-
59
-
60
-
61
-
62
-
63
-
64
-
65
-
66
-
67
-
68
-
69
-
70
-
71
-
72
-
73
-
74
-
75
-
76
-
77
-
78
-
79
-
80
-
81
-
82
-
83
-
84
-
85
-
86
-
87
-
88
-
89
-
90
-
91
-
92
 |
 |
