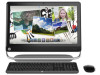
HP TouchSmart 520-1010t Getting Started - Page 10
Connecting to a Network, Setting up a wired Ethernet network connection
 |
View all HP TouchSmart 520-1010t manuals
Add to My Manuals
Save this manual to your list of manuals |
Page 10 highlights
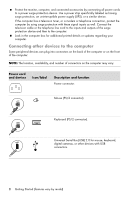
Connecting to a Network This section describes connecting to a network through a wired or wireless connection. Setting up a wired Ethernet network connection The Ethernet (RJ-45) connector on the back of the computer provides a high-speed or broadband connection to a network. After you connect this interface to a network, such as a Local Area Network (LAN), you can connect to the Internet through the network. 1 Connect an Ethernet cable to the Ethernet (RJ-45) connector (A) on the back of the computer, and to the network router or LAN device. 2 With the computer turned on, check the indicator lights (B) next to the Ethernet connector for the status: ACTIVITY - Lit yellow during network data transfer activity LINK - Lit green when there is a valid network connection NOTE: Your Ethernet connector may have only one indicator light. Setting up a wireless network connection (Select models only) You can connect the computer to a wireless network supporting IEEE 802.11b, 802.11g, or 802.11n by using the antenna that is included with the computer. If provided, connect the external antenna to the wireless antenna connector on the network card to increase the range and sensitivity of the wireless radio signal. NOTE: For the best wireless performance, place the antenna on the top of the computer or in an elevated and open area. You need an existing wireless LAN with an Internet connection. Consult your Internet Service Provider (ISP) for further information. To verify that the integrated WLAN device is installed on the computer correctly, see "Internet access" on page 37. For more information about setting up a wireless network: Click the Windows Start button , click Help and Support, and then type setting up a wireless network into the Search Help box and press Enter. 6 Getting Started (features vary by model)
-
 1
1 -
2
-
3
-
4
-
 5
5 -
 6
6 -
 7
7 -
 8
8 -
 9
9 -
 10
10 -
 11
11 -
 12
12 -
 13
13 -
 14
14 -
 15
15 -
16
-
17
-
18
-
19
-
20
-
21
-
22
-
23
-
24
-
25
-
26
-
27
-
28
-
29
-
30
-
31
-
32
-
33
-
34
-
35
-
36
-
37
-
38
-
39
-
40
-
41
-
42
-
43
-
44
-
45
-
46
-
47
-
48
-
49
-
50
-
51
-
52
-
53
-
54
-
55
-
56
-
57
-
58
-
59
-
60
-
61
-
62
-
63
-
64
 |
 |
