HP Vectra VE 5/xxx HP Vectra VE 5/xx Series 2, User's Guide - Page 64
After Installing an, Upgrade Processor
 |
View all HP Vectra VE 5/xxx manuals
Add to My Manuals
Save this manual to your list of manuals |
Page 64 highlights
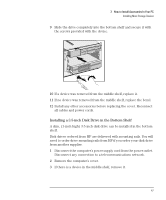
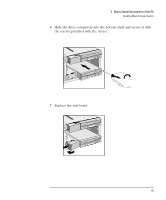
3 How to Install Accessories In Your PC Installing an Upgrade Processor 5 To install the new processor: a Locate the corner markers: • on the processor-a dot or notch ("broken" corner) • on the processor socket-a dot. b Position the processor over the socket, with it's corner marker facing the corner marker on the socket. c Place the processor into the socket. d Lower the lever to lock the processor into place. e Replace the heatsink and fasten the clip, if the heatsink is not attached to the processor. 6 Set the switches on the system board for the correct processor speed. Refer to the section "System Board Connectors and Switches" on page 104. If you use an Intel Overdrive processor, refer to the instruction leaflet supplied with the processor to see whether you should change the position of any switches on the system board. 7 Replace the computer's power supply and cover. Reconnect all cables and power cords. After Installing an Upgrade Processor Switch on the PC and verify that the new processor is recognized by the Power-On-Self-Test. 52 English
-
 1
1 -
2
-
3
-
4
-
5
-
6
-
7
-
8
-
9
-
10
-
11
-
12
-
13
-
14
-
15
-
16
-
17
-
18
-
19
-
20
-
21
-
22
-
23
-
24
-
25
-
26
-
27
-
28
-
29
-
30
-
31
-
32
-
33
-
34
-
35
-
36
-
37
-
38
-
39
-
40
-
41
-
42
-
43
-
44
-
45
-
46
-
47
-
48
-
49
-
50
-
51
-
52
-
53
-
54
-
55
-
56
-
57
-
58
-
 59
59 -
 60
60 -
 61
61 -
 62
62 -
 63
63 -
 64
64 -
 65
65 -
 66
66 -
 67
67 -
 68
68 -
 69
69 -
70
-
71
-
72
-
73
-
74
-
75
-
76
-
77
-
78
-
79
-
80
-
81
-
82
-
83
-
84
-
85
-
86
-
87
-
88
-
89
-
90
-
91
-
92
-
93
-
94
-
95
-
96
-
97
-
98
-
99
-
100
-
101
-
102
-
103
-
104
-
105
-
106
-
107
-
108
-
109
-
110
-
111
-
112
-
113
-
114
-
115
-
116
-
117
-
118
-
119
-
120
-
121
-
122
-
123
-
124
-
125
-
126
-
127
-
128
-
129
-
130
-
131
-
132
-
133
-
134
-
135
-
136
-
137
-
138
-
139
-
140
-
141
-
142
-
143
-
144
-
145
-
146
-
147
-
148
 |
 |
