HP iPAQ h1900 iPAQ H1910 user guide - Page 29
Then push the left side of the battery in place
 |
View all HP iPAQ h1900 manuals
Add to My Manuals
Save this manual to your list of manuals |
Page 29 highlights
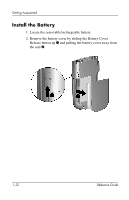
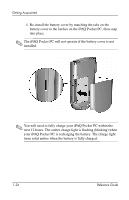
Getting Acquainted 3. Slide in the battery (with the label side up) so that the connectors on the right side are fully seated on the pins 1. Then push the left side of the battery in place 2. Reference Guide 1-23
-
 1
1 -
2
-
3
-
4
-
5
-
6
-
7
-
8
-
9
-
10
-
11
-
12
-
13
-
14
-
15
-
16
-
17
-
18
-
19
-
20
-
21
-
22
-
23
-
 24
24 -
 25
25 -
 26
26 -
 27
27 -
 28
28 -
 29
29 -
 30
30 -
 31
31 -
 32
32 -
 33
33 -
 34
34 -
35
-
36
-
37
-
38
-
39
-
40
-
41
-
42
-
43
-
44
-
45
-
46
-
47
-
48
-
49
-
50
-
51
-
52
-
53
-
54
-
55
-
56
-
57
-
58
-
59
-
60
-
61
-
62
-
63
-
64
-
65
-
66
-
67
-
68
-
69
-
70
-
71
-
72
-
73
-
74
-
75
-
76
-
77
-
78
-
79
-
80
-
81
-
82
-
83
-
84
-
85
-
86
-
87
-
88
-
89
-
90
-
91
-
92
-
93
-
94
-
95
-
96
-
97
-
98
-
99
-
100
-
101
-
102
-
103
-
104
-
105
 |
 |

Getting Acquainted
Reference Guide
1–23
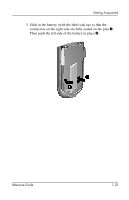
3. Slide in the battery (with the label side up) so that the
connectors on the right side are fully seated on the pins
1
.
Then push the left side of the battery in place
2
.