HP mt20 Administrator Guide - Page 61
Undoing a change, Applying the changes permanently, HP ThinState, Managing an HP ThinPro image
 |
View all HP mt20 manuals
Add to My Manuals
Save this manual to your list of manuals |
Page 61 highlights
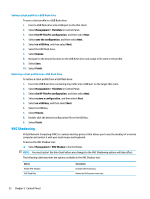
Undoing a change You can undo each change, one at a time, if the changes have not yet been applied permanently. A restart of the thin client is required after each undo. To undo a change made with the Component Manager: 1. In the Component Manager, select Revert Last Change. 2. Select Yes to restart the thin client. Repeat this process for as many changes you want to undo. IMPORTANT: If you take a snapshot of the image while testing a new configuration, you cannot undo the changes via the Component Manager. Those changes can be undone only by restoring a previous snapshot via the Snapshots tool. However, this does not work if the changes have already been applied permanently, because that function deletes all existing snapshots. If changes have already been applied permanently, you must reinstall the operating system to restore most removed components. Some components (such as Citrix, RDP, and VMware Horizon View) might be available as add-ons on the web and can be restored by reinstalling them. Applying the changes permanently To apply changes made with the Component Manager permanently: IMPORTANT: After the new configuration is applied permanently, all snapshots are removed and a new factory snapshot is created. Removed components cannot be restored after this point. 1. In the Component Manager, select Apply Component Configuration. 2. Select Yes. HP ThinState HP ThinState allows you to capture and deploy an HP ThinPro image or configuration (profile) to another thin client of compatible model and hardware. Managing an HP ThinPro image Capturing an HP ThinPro image to an FTP server To capture an HP ThinPro image to an FTP server: IMPORTANT: The directory on the FTP server where you intend to save the captured image must already exist before initiating the capture. 1. Select Management > ThinState in Control Panel. 2. Select the HP ThinPro image, and then select Next. 3. Select make a copy of the HP ThinPro image, and then select Next. 4. Select a FTP server, and then select Next. 5. Enter the FTP server information in the fields. NOTE: The name of the image file is set by default to be the thin client's hostname. Select Compress the image if you want to compress the captured image. Management 49
-
 1
1 -
2
-
3
-
4
-
5
-
6
-
7
-
8
-
9
-
10
-
11
-
12
-
13
-
14
-
15
-
16
-
17
-
18
-
19
-
20
-
21
-
22
-
23
-
24
-
25
-
26
-
27
-
28
-
29
-
30
-
31
-
32
-
33
-
34
-
35
-
36
-
37
-
38
-
39
-
40
-
41
-
42
-
43
-
44
-
45
-
46
-
47
-
48
-
49
-
50
-
51
-
52
-
53
-
54
-
55
-
 56
56 -
 57
57 -
 58
58 -
 59
59 -
 60
60 -
 61
61 -
 62
62 -
 63
63 -
 64
64 -
 65
65 -
 66
66 -
67
-
68
-
69
-
70
-
71
-
72
-
73
-
74
-
75
-
76
-
77
-
78
-
79
-
80
-
81
-
82
-
83
-
84
-
85
-
86
-
87
-
88
-
89
-
90
-
91
-
92
-
93
-
94
-
95
-
96
-
97
-
98
-
99
-
100
-
101
-
102
-
103
-
104
-
105
-
106
-
107
-
108
-
109
-
110
-
111
-
112
-
113
-
114
-
115
-
116
-
117
-
118
-
119
-
120
-
121
-
122
-
123
-
124
-
125
-
126
-
127
-
128
-
129
-
130
-
131
-
132
-
133
-
134
-
135
-
136
-
137
-
138
-
139
-
140
-
141
-
142
-
143
-
144
-
145
-
146
-
147
-
148
-
149
-
150
-
151
-
152
-
153
-
154
-
155
-
156
-
157
-
158
-
159
-
160
-
161
-
162
-
163
-
164
-
165
-
166
 |
 |
