HP mt20 Administrator Guide - Page 64
Saving a client profile to a USB flash drive, VNC Shadowing, Saving a client, to a USB, drive
 |
View all HP mt20 manuals
Add to My Manuals
Save this manual to your list of manuals |
Page 64 highlights
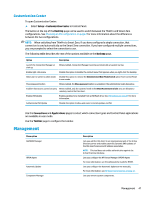
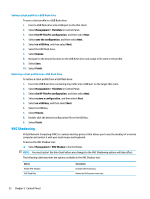
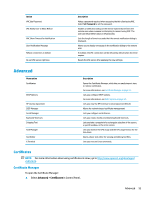
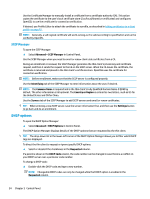
Saving a client profile to a USB flash drive To save a client profile to a USB flash drive: 1. Insert a USB flash drive into a USB port on the thin client. 2. Select Management > ThinState in Control Panel. 3. Select the HP ThinPro configuration, and then select Next. 4. Select save the configuration, and then select Next. 5. Select on a USB key, and then select Next. 6. Select the USB flash drive. 7. Select Browse. 8. Navigate to the desired location on the USB flash drive and assign a file name to the profile. 9. Select Save. 10. Select Finish. Restoring a client profile from a USB flash drive To restore a client profile from a USB flash drive: 1. Insert the USB flash drive containing the profile into a USB port on the target thin client. 2. Select Management > ThinState in Control Panel. 3. Select the HP ThinPro configuration, and then select Next. 4. Select restore a configuration, and then select Next. 5. Select on a USB key, and then select Next. 6. Select the USB key. 7. Select Browse. 8. Double-click the desired configuration file on the USB key. 9. Select Finish. VNC Shadowing Virtual Network Computing (VNC) is a remote desktop protocol that allows you to see the desktop of a remote computer and control it with your local mouse and keyboard. To access the VNC Shadow tool: ▲ Select Management > VNC Shadow in Control Panel. NOTE: You must restart the thin client before any changes to the VNC Shadowing options will take effect. The following table describes the options available in the VNC Shadow tool. Option Enable VNC Shadow VNC Read Only Description Enables VNC Shadowing. Makes the VNC session read-only. 52 Chapter 5 Control Panel
-
 1
1 -
2
-
3
-
4
-
5
-
6
-
7
-
8
-
9
-
10
-
11
-
12
-
13
-
14
-
15
-
16
-
17
-
18
-
19
-
20
-
21
-
22
-
23
-
24
-
25
-
26
-
27
-
28
-
29
-
30
-
31
-
32
-
33
-
34
-
35
-
36
-
37
-
38
-
39
-
40
-
41
-
42
-
43
-
44
-
45
-
46
-
47
-
48
-
49
-
50
-
51
-
52
-
53
-
54
-
55
-
56
-
57
-
58
-
 59
59 -
 60
60 -
 61
61 -
 62
62 -
 63
63 -
 64
64 -
 65
65 -
 66
66 -
 67
67 -
 68
68 -
 69
69 -
70
-
71
-
72
-
73
-
74
-
75
-
76
-
77
-
78
-
79
-
80
-
81
-
82
-
83
-
84
-
85
-
86
-
87
-
88
-
89
-
90
-
91
-
92
-
93
-
94
-
95
-
96
-
97
-
98
-
99
-
100
-
101
-
102
-
103
-
104
-
105
-
106
-
107
-
108
-
109
-
110
-
111
-
112
-
113
-
114
-
115
-
116
-
117
-
118
-
119
-
120
-
121
-
122
-
123
-
124
-
125
-
126
-
127
-
128
-
129
-
130
-
131
-
132
-
133
-
134
-
135
-
136
-
137
-
138
-
139
-
140
-
141
-
142
-
143
-
144
-
145
-
146
-
147
-
148
-
149
-
150
-
151
-
152
-
153
-
154
-
155
-
156
-
157
-
158
-
159
-
160
-
161
-
162
-
163
-
164
-
165
-
166
 |
 |
