Hitachi CD14F Instruction Manual - Page 13
Warning, Caution - scale
 |
UPC - 717709006423
View all Hitachi CD14F manuals
Add to My Manuals
Save this manual to your list of manuals |
Page 13 highlights
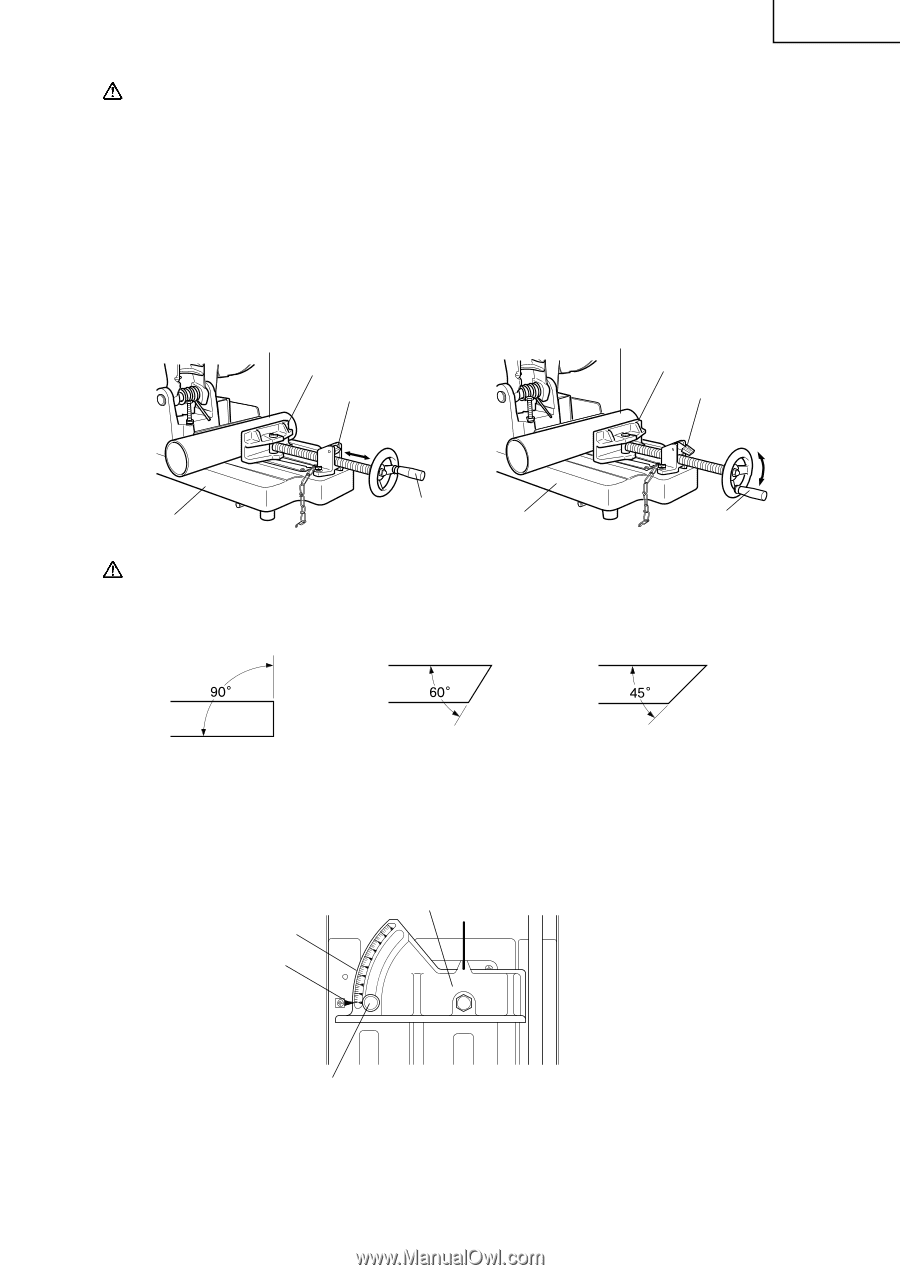
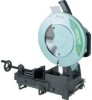
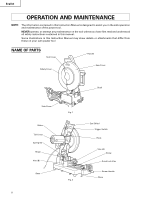
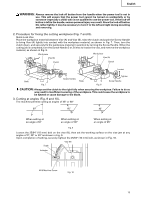
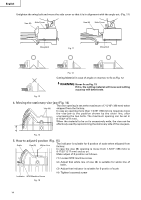
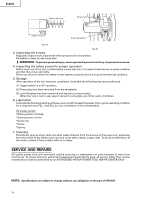
English WARNING: Always remove the lock-off button from the handle when the power tool is not in use. This will ensure that the power tool cannot be turned on accidentally or by someone (especially a child) who is not qualified to use the power tool. If the lock-off button is left in the handle, serious personal injury can result. Since the lock-off button fits rather tightly, it may be necessary to turn it to the left and right during mounting and removing. 2. Procedure for fixing the cutting workpiece (Fig. 7 and 8). Quick Lock Vise Place the workpiece material between Vise (A) and Vise (B), raise the clutch and push the Screw Handle to bring Vise (A) lightly into contact with the workpiece material, as shown in Fig. 7. Then, turn the clutch down, and securely fix the workpiece material in position by turning the Screw Handle. When the cutting job is completed, turn the Screw Handle 2 or 3 times to loosen the vise, and remove the workpiece material, as shown in Fig. 8. Work piece Vise (A) Work piece Vise (A) Clutch Clutch Move Loosen Base Fig. 7 Screw Handle Base Fig. 8 Tighten Screw Handle CAUTION: Always set the clutch to the right fully when securing the workpiece. Failure to do so way result in insufficient securing of the workpiece. This could cause the workpiece to be ejected or cause damage to the blade. 3. Cutting at angles (Fig. 9 and 10). The machine permits cutting at angles of 45° or 60° When setting at an angle of 0° When setting at an angle of 30° When setting at an angle of 45° Fig. 9 Loosen the 25/64" (10 mm) bolt on the vise (B), then set the working surface on the vise-jaw at any angles of 0°, 30° or 45° as shown in Fig. 9. Upon completion of setting, securely tighten the 25/64" (10 mm) bolt, as shown in Fig. 10. Vise (B) Scale Indicator M10 Machine Screw Fig. 10 13
-
 1
1 -
2
-
3
-
4
-
5
-
6
-
7
-
 8
8 -
 9
9 -
 10
10 -
 11
11 -
 12
12 -
 13
13 -
 14
14 -
 15
15 -
 16
16 -
 17
17 -
 18
18 -
19
-
20
-
21
-
22
-
23
-
24
-
25
-
26
-
27
-
28
-
29
-
30
-
31
-
32
-
33
-
34
-
35
-
36
-
37
-
38
-
39
-
40
-
41
-
42
-
43
-
44
-
45
-
46
-
47
-
48
-
49
-
50
-
51
-
52
-
53
-
54
-
55
-
56
 |
 |